As pointed out in Part 2, my use of a broken line inking style requires an extra operation using the
Stroke tool to close the gaps in each paint area; otherwise, because the gaps are too large for automatic closing, the areas will not fill with color.
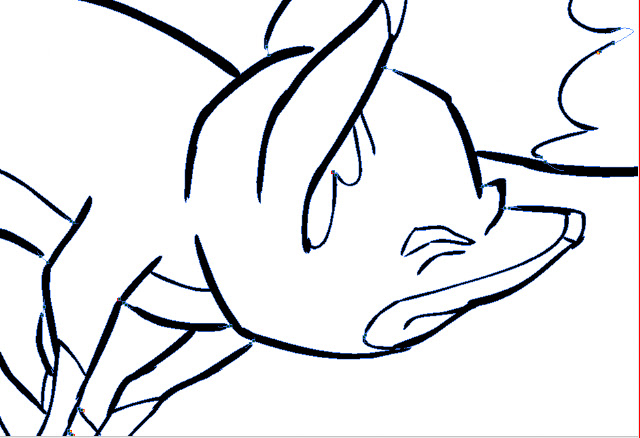
Here is an example of an inked fox image:
 |
| A fox image, inked but not yet ready for painting because of the large, deliberate gaps in the lines. |
|
|
The large gaps shown here should be closed using the
Stroke tool, which is on the toolbar in a pull-down menu with the
Paint tool. The
Stroke tool is applied as you would use the pencil tool, in whatever straight or curved or even meandering style you care to employ. It is important to understand not to use the
Close Gap tool for these large gaps, because the
Close Gap tool, while it will indeed close any gap, will always take the shortest and straightest path between the two points you are connecting, whereas you will find that you often may want to follow a suggested curve or other path when connecting two points. For example, if I wanted to close the large gap at the back of the fox's head in the above illustration, I would want to follow the arc of the two lines being connected.
Here is the same image with the connecting strokes applied and made visible in blue.
 |
| A detail of the first image, with connecting strokes visible. |
|
Note the stroke connecting the two curved lines at upper right. This is an example of my stroke line completing the curves of the inked lines and coming together in a soft point .
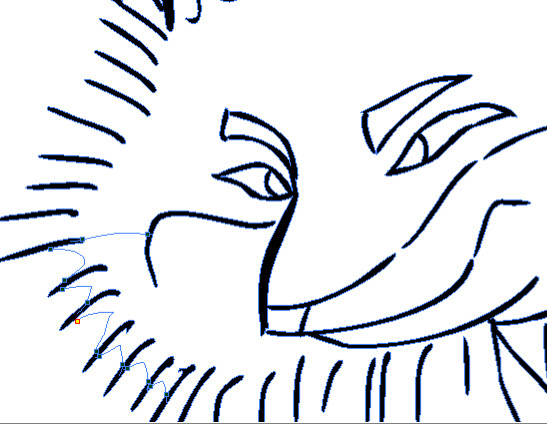
Here is an even closer view of the nose and brow area of the fox:
This shows clearly the strokes (in blue) connecting the line gaps in just the desired way.
When using the
Stroke or
Brush or just about any other tool, be sure to take advantage of the instant-response
Rotate View tool. This is one of the greatest and most useful tools available in most of the Toon Boom family of products from Studio on up through Animate Pro and Harmony, allowing you to spin your drawing surface to obtain the most effective angle for your hand.
Rotate View is accessed on the Mac by pressing Alt+Command, and by a similar key combination on the PC. The drawing disc icon that appears indicates its function; it is just like spinning the animator's drawing disc that was set into a traditional Hollywood studio animation desk.
Sometimes the
Stroke tool may be used in a more free-form or creative way than just for closing obvious gaps in lines. Here is an example of that.
 |
| . The gaps between each pair of border lines are connected using a line with a curve not based on the angles or curves of the inked lines. |
Here the radial lines indicate the bristling fur of the fox. I could have simply connected the lines with an arc perpendicular to the inked lines, but I wanted to finesse and soften the connections. With the
Stroke tool, this was easy to accomplish.
Next: Painting the Images


No comments:
Post a Comment