
Here is what the timeline looks like after the drawings are imported:

Note: I should mention that what I describe here is my own system. Of the kinds of animation it is possible to do in Animate Pro, Toon Boom provides the least information and guidance about importing completed animation drawings. No doubt this is because it is the least popular type of animation among its user base, so there is less demand for technical help, and because animators who can do all their animation on paper before entering the program usually know what they are doing.
At any rate, the drawings here are arranged in ascending number order in each layer, but the drawings of one layer do not yet have any meaningful relationship to the drawings of another layer. For example, drawing 1 of the Body layer is meant to be held for many frames, but until it is inked and painted it will occupy only one.
I now begin the inking process, which looks like this:

The red frames on the layer BODY are the inked frames of the layer Body, directly below.
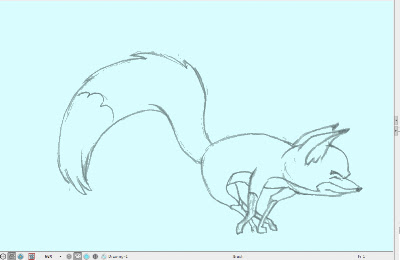
I have chosen a style using two weights of brush line, which are basically the default brush 2 and the default brush 3, although I have changed the property values of each somewhat. Brush 2 gives a thin line without much variation, while brush 3 has a heavier line with a lot of thick and thin variation. You will want to experiment to get the right amounts of Minimum and Maximum Size, and of Smoothness and Contour Optimization for your own purposes. On the fox character I am using brush 2 for interior lines and anything else that is of a delicate nature, like the outlines of the lower legs. Brush 3 is for everything else.
Also because I like the look, I am allowing the line to break, or to not always connect with other lines. This will necessitate a lot of work with the Stroke tool, which adds invisible lines to connect these gaps.
Here is a closeup showing the inking being applied over the bitmap scanned image. The scan was at 150dpi. It is blurry and I was forced to refer frequently to the actual pencil drawings to be able to make out some details.

 |
| A grey mode vector scan, this time over a blue color card. |
Next: Closing the Gaps
No comments:
Post a Comment