Pages

For People Crazy About 2D Animation!

Acme Punched! is for people crazy about 2D animation. It may be enjoyed by beginners and others, but it is aimed at animators who know already something about the process of animation and the basics of character animation. In large part, it will attempt to provide a deep look into the problem solving that goes on in my head as I work out a scene, often in step-by-step posts that I will sometimes enter in "real time", without knowing in advance what the outcome will be. Mistakes and false starts will not only be included but emphasized, so that the creative process of animation will be portrayed realistically. And, while my own bias is for 2D drawn animation, many of the effects and principles discussed here can apply to CGI 3D animation as well. I hope the blog will prove useful and instructive for all.

-Jim Bradrick

Thursday, January 17, 2013

No. 27, Problem Four: Forty Seconds In Two Weeks (Part 3)

Storyboard to Production Art


With the storyboard approved, I was anxious and able to get to work on the actual production artwork.  First I created detailed "tight" pencil drawings of all the elements--backgrounds, props, Santa--everything except one view of the client's product, a beer fermenter that was to be the showpiece of the last scene.  This would be created from a photograph provided by the company.

Here are a few of the drawings:

The bar with long shot of the fireplace.  This was the most complex drawing of the whole project.
The mantle in closeup.


These were all scanned and imported to Animate Pro, each on its own layer, ready for tracing and color.

Finally, there was the fermenter, a shiny stainless steel tank on a stand, with valves and pipes.  Though I had good color photos of this, I felt that the lighting depicted was not right for the setting, so in Photoshop I stripped out all the color, made it into a high-contrast black-and white-image, and then deleted all but the most essential linear elements.  This is what I then imported into Animate Pro:
The fermenter in linear form. 
From now I would be doing everything entirely in Animate Pro.  After inking everthing in black with a thin but variable brush, I then filled all the forms with temporary colors, using a palette limited to just six values of blue-gray.  This was partly to establish my value range and partly to prove that all the inking gaps were closed.


Next: Color and Movement, and the Finished Movie

Sunday, January 13, 2013

No. 26, Scanner Trouble

Mountain Lion Can Be Dangerous!


I am a long-time Mac user, and I felt I had gone too long without upgrading my operating system.  Last month I was still on plain Leopard, which was three upgrades behind.  Software was beginning to appear on the market that would not run on Leopard, so I had to first move up to Snow Leopard before I could move on to anything else.  But then I was able to leap over Lion to the current system, Mountain Lion.  Up to date once again, I could breathe a sigh of relief, until...

Until I attempted to scan a drawing.  First it crashed Photoshop, repeatedly.  Photoshop CS4 is what I have always used to import images from my scanner, a Mustek large-format flatbedl, the model A3 USB 1200 Pro.  I recently wrote glowingly about this scanner in my post Drawings Into Digital: Part 1--Scanning.  That was in early November of last year.

A paperless drawing.  Yes, I can do them, but I still want my scanner back!


Now I am out on a limb.  It turns out that Mustek does not have drivers for their scanners which work on OS 10.7 (Lion) or 10.8 (Mountain Lion).  For me, this is bad news.  My Epson Stylus CX5000 all-in-one (scanner, printer, copier) also will not work in scanning mode, but I could replace it for about US$80.  I can't replace my Mustek large format scanner so easily, and it is very important to my work.  As an animator who works on standard animation paper, which is 10 1/2" x 12 1/2", I have to have a large format scanner to get my hundreds--sometimes thousands--of drawings into the computer efficiently and in correct register.

My hope is that Mustek will soon provide the needed drivers, and I will be back in business.  My hope is that it is fair to say that they do not yet have the drivers--but that they soon will.

Anyway, for now I hope other Mac users who depend on their scanners will be alerted to this problem.  I will be posting some warnings on Linked In animation group sites also.

Thursday, January 10, 2013

No. 25, Problem Four: Forty Seconds In Two Weeks (Part 2)


The Storyboard


Here is the whole storyboard, panel by panel:
T
This storyboard was accepted enthusiastically by the client, with only two changes requested:  they wanted to start with an exterior shot of the brewpub--really, more of a large brewery--and to have a greeting card placed on the fireplace mantle.

My partner, Don, did a color comp of the exterior:
By now it was December 11, so we asked for a few days extension and they agreed to delivery on the 19th.  But now I had the green light to go ahead; I had to take all the elements from the storyboard and put them into a form that would work in Animate Pro.


Let's now evaluate what was required to get this little production out the door:

A--Background Art
One highly detailed view of the bar and taproom.  This was conceived in one-point perspective so that the back wall would work both with the wide taproom shot and also with the medium to close shot of the fireplace.

Another detailed background had been added: the opening exterior shot.

A closeup shot of the fireplace mantle, fairly simple.

B-Complex Props and Objects
This includes several shots of the client's tanks and other projects, with accurate logos.  Some logos would be hand-drawn, some taken from photos.  The beauty shot of the fermenter that is revealed when the bag falls open was a photo manipulated into line art in Photoshop, then further rendered and colored in Animate Pro.  This was the most critical and complicated element to do.

C-Simple Props and Objects
This category is comprised of all the mugs, plates, pretzels, the legs and arm of Santa, the wreath and the Christmas tree.

D-Animation
Aside from the snow falling, which was done with an automated process in Adobe After Effects, there were only three elements to animate: the beer foam sliding down the glass, Santa's arm reaching in, and the bag falling to the floor.  Only the bag would require multiple drawings.

E-Camera Moves
To be done in Animate Pro.

F-Post Production
 Includes FX such as dissolves and fades, SFX like sleigh bells and munching,  and music.  The end title card also ended up as a post production item .  Don was in charge of all this, but he couldn't start until I did my part.


Next: Getting the Art Into Toon Boom

Saturday, January 5, 2013

No. 24, Problem Four: Forty Seconds In Two Weeks (Part 1)

The Concept


Early in December, I got word from my associate and sometimes partner Don Wallace that he had had a request for a Christmas holiday ecard to be custom made.  The client did not know much about animation, and as is usual in such cases, had no idea of the cost or of the time involved in producing animation.  The client's original idea was far too ambitions for both the money they had to spend and the time allowed.  It had to be done by around December 15.

Don and I decided to counter propose with a concept that was doable both in time and money, yet which would be attractive and also fun to do.  Fun and creative stimulation are things I try to find or inject into all my projects.

The Counter Proposal


So far in this blog I have put a lot of emphasis on full animation, no matter how much time it takes.  This is possible because 1) my film, The Crossing, is a personal project with no deadlines, because 2) I am semi-retired and have a lot of time for it, and because 3) I have a lot of passion for that kind of animation.

But in reality, I am well schooled in time- and labor-saving techniques for just such a project as this one, and I know how to get a good-looking result in a short time.

I conceived an ecard that would get most of its movement from the camera, that would involve just a couple of elaborate backgrounds, and where the only place I would use full animation was in one climactic shot where that animation would consist of only about 15 drawings.

After conferencing with Don on the phone, I wrote a verbal script of my idea.  He submitted it to the client and got their approval.

I began drawing master layouts of the concepts that would make best use of our ideas of camera movement to tell the story.

The client was a metal fabricating company specializing in tanks and other equipment for brew pubs.  I looked at a lot of pictures of brewpubs and taprooms and came up with this drawing showing a "typical" taproom decorated for the Christmas season.  This is a freehand drawing, but it does conform to one-point perspective, with the vanishing point visible just to the right of the right-hand window.

This is another key layout showing how Santa would be standing at the hearth of the fireplace.  It was later decided at Don's suggestion that Santa would not be seen in full figure, that it would be more mysterious to show only parts of him close up, but this drawing was necessary for me to fully visualize the setup, of which I would be showing only details.

If you compare these two drawings with those of the storyboard or of images from the final film, you will see that it was also determined that the tables and chairs were unnecessary complications.


Two days later I submitted the storyboard.

Next: Storyboarding the e-card


Monday, December 31, 2012

No. 23, Problem 3: The Fox On the Man's Head (Part 7)

The Finished Scene


It would have been perhaps just as appropriate to label this post Drawings Into Digital: Part 4--The Finished Scene, but for any of you who have been with me in parts 1 through 6 of The Fox On the Man's Head, I didn't want you to miss the payoff.

Here is the scene:

As I said I would, I have added a camera move-- a truck-in near the end--and an eye blink for the man, which I drew directly in Animate Pro and repeated once, to give the man's hold pose a little life.  I also put in a placeholder sound effect for the fox shaking himself out; it is not quite what I want there and I intend to switch it out when I find or record a more appropriate sound, but it will do for now.


This is my last post for 2012, and at this time I want to wish a Happy New Year to all my friends around the world.  I have been pleased this year to have hits not only in North America but from India, Ukraine, Spain, Sweden, Brazil, Australia, Israel, Germany, Macedonia and many other countries in every part of the earth.  I thank you for your interest.

For 2013 I promise you many more posts detailing my investigations into the fascinating world of 2D animation, mostly of the hand-drawn variety.  But first I will give you a look at a holiday ecard I was commissioned to do in a very short time--about two weeks--and which forced me to rely not on elaborate full animation but mostly on camerawork instead.


Next: Problem 4: Forty Seconds In Two Weeks (Part 1)  


Thursday, December 27, 2012

No. 22, Drawings into Digital: Part 4--Painting

Once you get your gaps closed (see Part 3), the painting is easy.  One thing you want to be sure to do right, though, is manage your palettes. Coloring anything that you might want to color again, without saving and labelling the color systematically, will be a mistake.

 Here is a shot of the basic Animate Pro palette:


Pretty simple, isn't it?  But this palette is just a jumping off place.  You can create hundreds or thousands of colors if needed, just by clicking on the New Color button, which is the + button at upper left.  Click  inside the color box, and you will be taken to Toon Boom's master palettes, where your choices are virtually limitless.

Here is my palette for the colors to be used in this scene:


In my case, I am still at a stage of production where I am not quite sure if the colors I am using for my characters will be the final choices.  But having labelled them Man Skin, Man Overalls, Fox Red, or whatever, I can then come back and change those colors in the palette, and everything that has been paiinted with the color of that name will change accordingly.  So not being sure of my colors turns out not to be a problem.

Here's an example of the first frame of the scene showing three layers (from the bottom: man, fox, tail) all assembled.

First frame of the scene, painted and assembled, but without the background.
Following are a couple of examples of the painted artwork of shots mentioned in earlier posts about this scene.

A shot of a fast motion double image of the fox, showing how I handled the coloring of the second "ghost" image.

A frame showing the fox's fur all bristled out, just after he shakes himself.

And finally, here is the last frame of the scene in full, anti-aliased render mode:


Next: The Whole Scene!

Sunday, November 25, 2012

No. 21, Drawings into Digital: Part 3--Closing the Gaps

As pointed out in Part 2, my use of a broken line inking style requires an extra operation using the Stroke tool to close the gaps in each paint area; otherwise, because the gaps are too large for automatic closing, the areas will not fill with color.

Here is an example of an inked fox image:
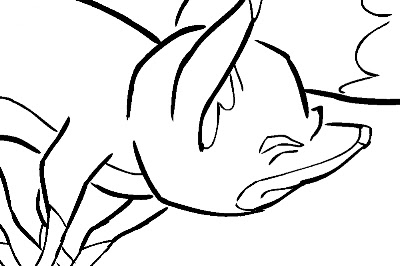
A fox image, inked but not yet ready for painting because of the large, deliberate gaps in the lines.

The large gaps shown here should be closed using the Stroke tool, which is on the toolbar in a pull-down menu with the Paint tool.  The Stroke tool is applied as you would use the pencil tool, in whatever straight or curved or even meandering style you care to employ.  It is important to understand not to use the Close Gap tool for these large gaps, because the Close Gap tool, while it will indeed close any gap, will always take the shortest and straightest path between the two points you are connecting, whereas you will find that you often may want to follow a suggested curve or other path when connecting two points.  For example, if I wanted to close the large gap at the back of the fox's head in the above illustration, I would want to follow the arc of the two lines being connected.

Here is the same image with the connecting strokes applied and made visible in blue.
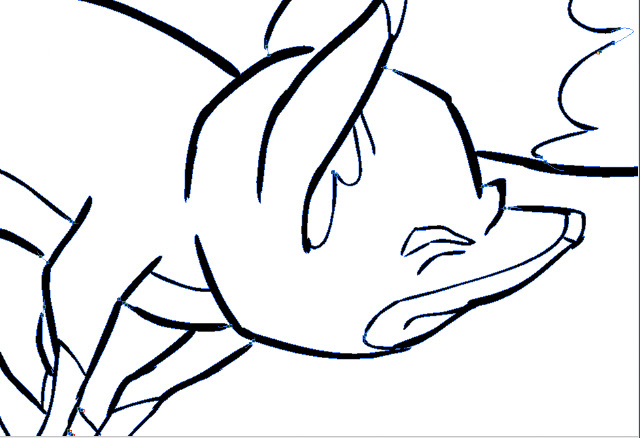
A detail of the first image, with connecting strokes visible.
Note the stroke connecting the two curved lines at upper right.  This is an example of my stroke line completing the curves of the inked  lines and coming together in a soft point .

Here is an even closer view of the nose and brow area of the fox:
This shows clearly the strokes (in blue) connecting the line gaps in just the desired way.

When using the Stroke or Brush or just about any other  tool, be sure to take advantage of the instant-response Rotate View tool.  This is one of the greatest and most useful tools available in most of the Toon Boom family of products from Studio on up through Animate Pro and Harmony, allowing you to spin your drawing surface to obtain the most effective angle for your hand.  Rotate View is accessed on the Mac by pressing Alt+Command, and by a similar key combination on the PC.  The drawing disc icon that appears indicates its function; it is just like spinning the animator's  drawing disc that was set into a traditional Hollywood studio animation desk.

Sometimes the Stroke tool may be used in a more free-form or creative way than just for closing obvious gaps in lines.  Here is an example of that.
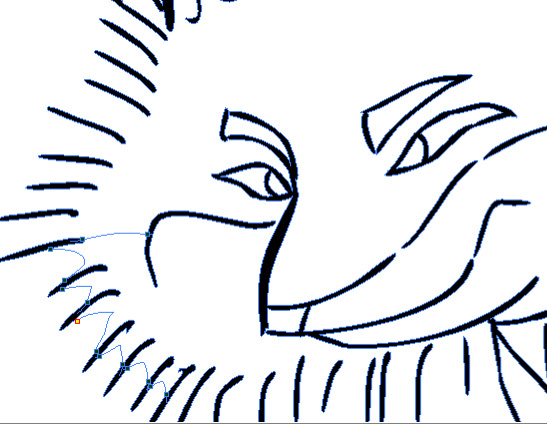
.  The gaps between each pair of border lines are connected using a line with a curve not based on the angles or curves of the inked lines.
Here the radial lines indicate the bristling fur of the fox.  I could have simply connected the lines with an arc perpendicular to the inked lines, but I wanted to finesse and soften the connections.  With the Stroke tool, this was easy to accomplish.

Next: Painting the Images