
Pages

For People Crazy About 2D Animation!

Acme Punched! is for people crazy about 2D animation. It may be enjoyed by beginners and others, but it is aimed at animators who know already something about the process of animation and the basics of character animation. In large part, it will attempt to provide a deep look into the problem solving that goes on in my head as I work out a scene, often in step-by-step posts that I will sometimes enter in "real time", without knowing in advance what the outcome will be. Mistakes and false starts will not only be included but emphasized, so that the creative process of animation will be portrayed realistically. And, while my own bias is for 2D drawn animation, many of the effects and principles discussed here can apply to CGI 3D animation as well. I hope the blog will prove useful and instructive for all.

-Jim Bradrick

Saturday, October 28, 2017

No. 139, What's Inside, 2: The Gadget, Part Two


The Numbers Racket


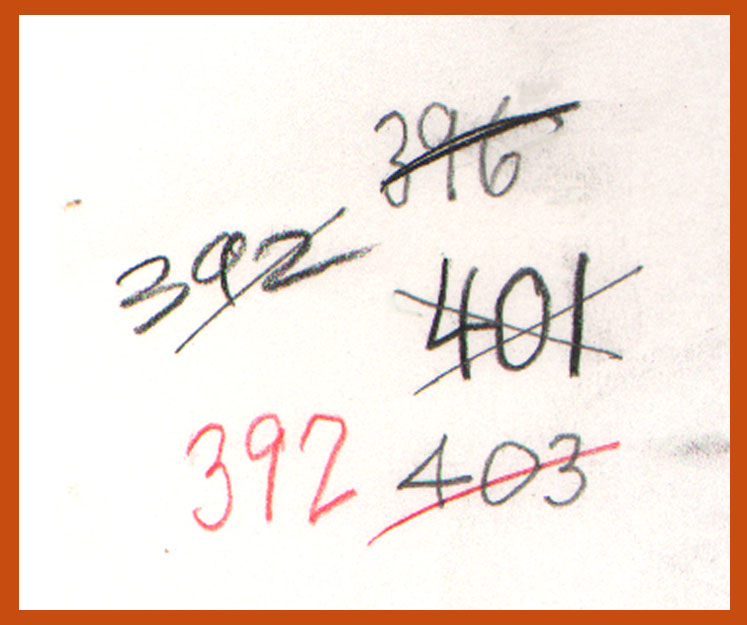
Depending on what changes are made, a drawing number might eventually return to its original designation!

In 3D animation, the frame or image numbers are counted for you, more or less, so if you make a change in timing, your computer just resets the numbers.  (Haha! If I am wrong about this, I expect some of you with more experience in 3D than I have will set me straight.)

Animating on paper, your drawings must be hand-numbered and those numbers must be entered on your (paper) exposure sheet. Later on, beyond scanning, your pencil test or animation program such as Animate Pro will track further changes. Before that, however, it is pencils and erasers.
Actual re-numbered drawings.


I confess that I have to use erasers for renumbering quite often. It is a simple matter of lack of experience. Perhaps you find that surprising, but my career experience compared to that of, say, a Ken Harris at Warner Brothers, is insignificant.

Consider that a Hollywood studio animator in the 1940s or 1950s would turn out up to 30 feet of animation a week. That's 20 seconds. He was responsible only for timing and extreme and breakdown drawings, and for making spacing guides for his inbetweener. In some situations, timing was already worked out by the director. And the animator worked at this week after week, year after year.  It got to the point where such an animator would look at a scene and know instinctively and accurately how long a hold should be, or how short. Thousands of career hours "on the board".

Compare that to the independent animator like me, who also has had to perform all the other job titles that animation production entails--storyboarding, layout, inbetweening, digital ink and paint (and, oh yes, actual ink and paint on cels until the 1990s), background art and camera  work--and you can see that my actual time spent "on the board" doing animation was but a small fraction of my total effort. What would be my footage count in a week? Averaged out, it would certainly be less than one foot.

Factor in also all the down time: time spent looking for new accounts, time waiting for contracts to be signed, time working at some day job when the animation work just wasn't there.

Is it any wonder that for all that I do know, I sometimes get it wrong when I try to time out in advance how long the Old Man should gaze into the darkness of his trunk before turning back to look at the guards? Not enough flying time; not enough hours "on the board."

Thus, I erase, renumber drawings, and sometimes have to renumber them again.  I elect to use a 12-frame hold, then see in pencil test that 16 or 20 frames is better. Some other hold is too long and gets shortened.  Yes, it is mostly changes in the duration of holds that causes my numbering changes. I need more experience "on the board."

But I'm working on that.

[Note: I use the Disney numbering system which links the drawing number directly to the frame number in the scene. Thus, if you add or subtract drawings or change an exposure length, all the subsequent numbers are thrown off. This is, admittedly, an awkward system for someone not yet sure of all timing.] 


And while I'm on the subject of timing, let me tell you about...

The Hold that Isn't There


Before continuing, please go back to post 138 and play the video again. Look for the part where the Old Man, after himself looking into the trunk, straightens up a bit and looks back to the right before plunging his hand in to get the cylinder.

Do you see the hold there?  Right at the top of the action, right before he turns back to the trunk? No?

Well, there was a hold there. It was just 6 frames long, right on this drawing here.

The drawing that was held for 6 frames.

I had been very deliberately experimenting with a moving hold there, getting the Old Man's head turned early in the move so that the pose of him looking to the right would read without actually holding on one drawing. Then, before testing it, I lost my nerve and added in that 6-frame hold. (Which affected the numbering from that point on.)  It did look okay that way, but later, remembering my original idea, I took that hold out--reducing the exposure on that drawing from 6 frames to 2, actually--and found that it still worked quite well.


Lesson learned: with 8 drawings or sixteen frames, closely spaced, all showing his head looking to the right, no actual held drawing is necessary. What about 14 frames or 12 or 10? Will the pose still read? Maybe. Every situation, every animation scene, is different. You can always do a pencil test.

Saturday, October 21, 2017

No. 138, What's Inside!, 1: The Gadget, Part One

Where have I been?


Me at St. Michael's Mount, Cornwall.
I took a month off for a road and hiking tour of western England, plus Wales and Scotland. Had a wonderful time but now I am back with plenty of new ideas for blog posts to keep you animators thinking.  Let's get into it!


Now that I have reached the actual animation stage of my film production of Carry On, I find it appropriate to try to detail all the thinking and planning that go into many of the scenes I will be animating. I am now calling this type of post "What's inside!".

"What's inside" means all the things that the animation includes in terms of drawing, timing, spacing and any other aspects of the animation process that can be explained, and also the missteps and changes that take place before the scenes are finally approved.

I'll start with a scene I have referenced before, scene 6-15, where the Old Man opens his trunk and pulls out a cylindrical device which he then holds out for the guards to see. I am still working on this and have made some changes in the last few days.

First, here is the latest version:


A Puzzle

I have a lot to say about this scene, but first I have a fun puzzler for you. I challenge you to compare the latest version with this slightly older one and then say what change in animation has been made between them.


Don't be distracted by the more complete drawings in the new one--that isn't what I am talking about. If you can see what I mean, contact me and I will send an original drawing to the first two people who get it right.


Getting into What's Inside!

Okay, I have already showed you (in post No. 137) how I animated some of the legs in a second pass.

Now lets look at the movement where the Old Man, beginning with his hand inside the trunk, lifts the cylinder out and then turns and holds it out toward the guards. This movement required 29 drawings on two's, so it lasts 2 1/2 seconds up to the hold at the end.

Simple? Not quite. There are really only two key drawiings: the first and the last. (Remember, key drawings are the drawings that tell the story.)

The two Key or story-telling drawings, 163 and 235.

But clearly I needed more extremes than that, because, for one thing, how are you going to chart 27 inbetweens?  That might look like this!

Also, the change from one key to the other is enormous, so a little control is necessary, and you get that by defining the move with some more extremes plugged in.

I did this by animating more or less straight ahead between the keys and, working rough, produced three extremes.

The added Extremes/Breakdowns: 195, 207 and 223.
I have called these drawings extremes because they bear timing charts, but in fact they are more in the nature of breakdowns. Breakdowns, remember, are important drawings--possibly as important as the extremes themselves--since they define just how the action gets from one extreme to the other, and they can be eccentric. By eccentric I mean unpredictable and, in terms of inbetweening, illogical, because they can go where an inbetween cannot go.

A major example of this in scene 6-15 is what happens with the head relative to the hand holding the cylinder. I decided that I wanted the cylinder to arrive sooner than the head to its final position, because the whole point of this action here is to get the cylinder out and display it to the guards. If you play the scene, you will see that the head arrives late and catches up with the left hand. This was easily done by simply showing the cylinder almost to the end of its arc by breakdown drawing 223, a full seven drawings before the hold.

Drawings 223 and 235. His left hand in the first drawing is
 in the final ease-in, while the head still has far to go.
But does the hand-and-cylinder really arrive  before the head? No, it doesn't; look closely at the video and you will see that everything in the drawing comes to a halt at the same time.  The difference is in the spacing of the drawings for each part, which obscures the fact that it does all stop at once.
Here you see the same two drawings in register, making the situation more clear.
Of course the better known way of gracefully going into a hold is to have follow-through on something, hair or clothing or a tail, on an extra layer.  This spacing is just another way of doing that --and of making your animation more interesting to watch!


To be continued in post no. 139...

Sunday, August 27, 2017

No. 137, Taking Steps Without Legs

I think I have touched upon this before, but it is an amazing thing that really does work: you can in some cases animate a character moving from one place to another, without drawing the legs or feet at all until the very end. And yes, I mean in a full figure scene that shows the legs and feet.

I just did it again in a scene I am animating, and even though I have done it before, it always requires a leap of faith to try it--to keep myself from blocking in the lower limbs.  Because, after all, doesn't that leave the head and upper body just hanging there in space? How can that ever come out right? I ask myself.

Well, it certainly does take some planning.

In my experience, you will want to know the precise perspective of the layout involved. You will want to be sure you understand your character's relation to that perspective. And you will want a solid key drawing--with legs and feet--both before the movement and at the end.

The fact is, when we step over from one position to another on the floor, we do not always bounce noticeably up and down with each step. Walk cycles are usually full of the up and down movement of the body mass, sometimes with a lot of squash and stretch to add weight to the character.  But like good dancers, we sometimes shift our position in a way that is more smooth and gliding, and the usual bobbing up and down is then unnecessary and even distracting.

Let's look at the scene to which I am referring. My Old Man character has just opened up his steamer trunk. Aware that he is being watched by security guards off the right side of the screen, he reaches into the trunk and pulls out a cylindrical object which he then holds out for the guards' inspection.

I did not start this scene with the intention of using the "no legs" technique; it just became appropriate in my mind when I saw that as the Old Man lifts out the cylinder, he must take two (or three or four) steps as he turns almost 180 degrees  and holds the object out. This move was to be done slowly with a moving hold at the end, involving 30 drawings on 2's and over 2 seconds.

As I began roughing in the extremes of this move, there were other complexities to think of, as for example that I wanted his hand with the cylinder to arrive first while his head and torso catch up a bit later. So I began leaving his legs and feet completely off the extreme drawings between no. 161 and the last drawing, no. 233.

Here are the extreme drawings nos. 161 at the beginning
and 233 at the end.
Even as I filled in the breakdown drawings and all the inbetweens, I did not think about the legs and feet.  His torso simply turned in midair, drifted across a little way, and came to rest at drawing 233, where he had his legs and feet once again.

Here are drawings 203, 213 and 225, as they looked when I first worked with them. At the time, I did not
know that they were to become extremes for the leg movements. (For purposes of this blog post,
I had to erase the legs in Photoshop to illustrate this stage of development.)
When at last I was ready to consider his steps as he moved across, a close look at the exposure sheet suggested that three steps might be just right. As an old man not always sure of his balance, it was appropriate for him to take short, uncertain steps, and I saw that the contact drawings--the drawings where his moving foot touched down--ought logically to come on frames 203, 213 and 225, giving 4 to five drawings between each pair of extremes.

The X-sheet, showing where I decided to place the contact drawings. Scenes like this
should not be attempted without charting your timing on an X-sheet first.

And note this: none of those three contact drawings was an extreme pose as regards the upper torso. This is fine, but to me the significance of that is that had I tried to do the legs and feet at the same time as the turning torso, I would no doubt have tried to force the contact drawings onto some of the existing extremes.  That might have worked out anyway, but it might also have resulted in something more stilted, less fluid, and less interesting to watch. Using this technique, I was completely free to place the contact drawings wherever seemed best, rather than just on one or another of the available extremes, since by this method all the drawings already existed.

Now these lowly inbetweens have become extreme contact
drawings for the leg movement

Here is the link to the video. This is not the whole scene but just the end of it.

This post serves as a reminder that it is often wise to make several passes over a scene, doing things one at a time, rather than struggle with the complexity of trying to get everything in all at once.


By the way, I am certainly not the first to think of doing this.  It is mentioned somewhere in Thomas and Johnston's Illusion of Life; when I locate the reference, I will amend this post with the details.

Wednesday, August 16, 2017

No. 136, Animatic Reviews

Back in Post No. 128, Animatic Private Viewings, I described my animatic review process. To a select group of associates, I had sent a link to the full animatic of my film Carry On, asking for reactions to the film as a whole. The animatic, a filmed and timed version of a complete storyboard, augmented with an audio scratch track that includes dialog, sound effects and some music,  can be a most valuable tool for the film maker, helping  him or her to see the strengths and weaknesses in the story structure, in character development, and in other areas--things that are not so apparent when one is focussed on just one detail or moment at a time.

But to reach this stage in production also provides an opportunity for gathering opinions from outside one's own consciousness. In the case of the independent film maker, without even a production staff off whom to bounce ideas and from whom to gather opinions, the value of some more objective opinion is even more important.

I got back written reviews from just four people. That is fewer than I had hoped for but it was a good
sampling.

No one hated it and they all liked at least parts of it.

Three of the four liked it a lot but had widely differing suggestions for changes, and no two people wanted to change the same exact things.

No one came up with a genius idea that allowed me to cut whole minutes while still telling the whole story.

There were several thoughtful explorations along the lines of "what if a certain character were more like this or that."

They all brought up issues that I had already struggled with and had set aside as either irrelevant or as requiring adding more or completely different scenes to the film. There were also a few instances where the character or scene existed for a logical tactical reason which my reviewer had not perceived.  For example, there is a scene with two characters whose only raison d'etre is to conceal the Old Man and his trunk from the view of the gate attendant until the last possible moment.

I am grateful for all the suggestions even if  I don't use many of them. But there was one objection which troubled me a lot and has made me decide to re-write two of the sequences, replacing a major character, even though that involves quite a lot of work.

I had written in a character who could be perceived as a cultural slur. If you are a regular reader of this blog, you will recognize him from some posts about character design that I did a while back. He is the one for which I created a head-and-shoulders maquette out of Sculpey.

Two drawn angles of Kevin, and his unfinished maquette.


I was bothered not only because one reviewer strongly disliked the character but because my wife had expressed a similar dislike.  (Some other reviewers did like Kevin for his strong comedy value.) And in my heart I didn't feel strongly attached to this character as I did to all the others in the film. In fact, I recognized that the character was artificial, conceived to advance the story as a person who had to provide a certain amount of resistance to letting the Old Man get past him, but who would then capitulate. He was a comic character, but comedy based too much on cultural stereotypes is unnecessary and unwise; I realized that a characterization that could be perceived as demeaning in this way would be shameful to have in my film.

And so, after much thought, I created another character who could fulfill the same purpose as Kevin had, but with different motives. He is actually better developed than the first one; he has a believable back story and a better relationship with the supervisor character with whom he interacts. It was a struggle to back myself up and re-think the two sequences that are involved, but I am now comfortable with the result.

Examples of the facial expressions inspired my my new character, Howard.

The lesson here is that nothing in your work should be considered immune from change if the reason for change is a strong one. Walt Disney knew this when he cut two already-animated sequences from Snow White. We should all remain open to the possibility of change even when it is painful.


Saturday, July 15, 2017

No. 135, The Subliminal Anticipation

Subliminal


The word means "below the level of consciousness" and was applied in the 1950s to images in advertising that were intended to influence the viewer without that viewer realizing what he had seen.
This might be an erotic image or other suggestive content cleverly inserted into a photograph or a single frame of film in a TV commercial. The single frame might be the words "BUY THIS!" Whether it was actually effective in marketing remains questionable.

In animation, I am coining the term subliminal anticipation to cover a technique described by Richard Williams in his book The Animator's Survival Kit. Williams doesn't use the word subliminal, instead referring to Invisible Anticipations on page 283 of his book (the first edition.)

Like most of the tips and tricks Williams describes, this is a subtle trick learned from Hollywood animators from the Warners and Disney studios to whom he "apprenticed" himself in the 1970s and 80s.

Unlike the obvious anticipations with which most of us are familiar, such as the windup of a baseball pitcher before the pitch--easily the most drawn-out anticipation example that I can think of--, the subliminal anticipation happens so fast that it isn't actually seen, but only felt. The images of the anticipation are shot on ones rather than twos (in terms of 24fps film speed), faster than the eye can register, and yet as Dick Williams puts it, they add a "snap" to an action that can be most effective.

I used this technique before an accented syllable in the dialog animation being analyzed in posts 132, 133 and 134 of this blog. As he speaks, the Old Man is lowering his head. One an accent, his head suddenly jerks upward and begins descending again on a new path. Before the accent is where I inserted two frames of subliminal anticipation.

First, let's look at a simplified example of the anticipation and accent using only a simple ellipse as the object.


Now, here is the same effect employed in dialog animation of the Old Man from my film in progress, Carry On.  I used this subliminal anticipation technique on both the syllable accents (IN-ternet and FA-il.)


Wednesday, June 21, 2017

No. 134, Let's Talk!, Part 3


In my last post, No. 133, you saw the first rough pencil test for a short scene of dialog from the Old Man.

Filling in more drawings, I stopped to do a second test. Perhaps I could have skipped this one but with digital scanning and playback, an extra pencil test takes only a few minutes of time.


A lot has been smoothed out here; no surprises. All that is needed now is to get the rest of the drawings in and check it one more time.

Here is the final pencil test that includes all the drawings.


Notice the accents on "IN-ternet" and on "FA-il."

I had just reviewed Dick Williams notes on accents in dialog in his Animator's Survival Kit, and I think I made good use of the technique.  There is something else I included in those: subliminal anticipations; that is, anticipations that are "felt" rather than "seen."


Next: Subliminal Anticipations Explored

Wednesday, June 7, 2017

No. 133, Let's Talk! Part 2

Working with the Soundtrack

For the Old Man's dialog for this scene, I have a four-second track to work from. Here is the sound clip with the accompanying storyboard panel.


Key Drawings


Beginning the animation, I made several key drawings--the drawings that best represent the style and spirit of the animation. As is often the case, my key drawings are also some of the extreme drawings in the scene. But a key drawing may not always be used as an extreme, as for example the storyboard image above, which puts across the idea without actually being useful as an extreme.

The scene's initial pose. Note that this is a rough.

Another rough.  He is saying, "You never know..."

Here, a cleanup, where he is saying "fail."

First Pencil Test

The scene will amount to about 50 drawings when done.  In the first pencil test, I have done only 28 of those drawings, but I am able to time it out to the soundtrack by adding extra hold frames wherever there are drawings missing.

We are using the Disney studio numbering method which specifies that if you are working on two's (two exposures per drawing), then beginning with 1, all the drawings will have odd numbers. Therefore, a sequence on two's would be 1, 3, 5, 7, 9, 11, 13, 15. If I have drawn only numbers 1, 3, 7, 13 and 15, then I expose the pencil test as follows:

Drawing 1, two frames.
Drawing 3, four frames (includes two frames to account for number 5 which is missing.)
Drawing 7, six frames (includes two frames each for numbers 9 and 11, which are missing.)
Drawing 13, two frames.
Drawing 15, two frames.

When you then play the pencil test, there will be some jerkiness but it is possible to match the dialog to the images and see how the action flows. In this case, there were a couple of areas where it was critical to see the full action, and where I therefore made sure to add in roughs of all the drawings.

Here is that first pencil test.


Next: A second pencil test in which many more drawings are present, and then a final test including all of the drawings.