Pages

For People Crazy About 2D Animation!

Acme Punched! is for people crazy about 2D animation. It may be enjoyed by beginners and others, but it is aimed at animators who know already something about the process of animation and the basics of character animation. In large part, it will attempt to provide a deep look into the problem solving that goes on in my head as I work out a scene, often in step-by-step posts that I will sometimes enter in "real time", without knowing in advance what the outcome will be. Mistakes and false starts will not only be included but emphasized, so that the creative process of animation will be portrayed realistically. And, while my own bias is for 2D drawn animation, many of the effects and principles discussed here can apply to CGI 3D animation as well. I hope the blog will prove useful and instructive for all.

-Jim Bradrick

Monday, January 25, 2016

No. 88, Storyboarding Tips: Thumbnails

Think Small Before Thinking Big


I just re-learned something I have really known for a very long time: that working out your thinking in thumbnail-size images is a smart way to go, whether you are animating or planning out your storyboard.

Sometimes I start storyboarding in full-size panels, which can work, but which sometimes results in having to do over a number of panels because of poor planning. Then I just feel foolish, and that is when I remind myself of the value of thumbnailing.


Thumbnails are drawings so tiny in scale that it is impossible to get in any detail. That is the point! Working in thumbnail size, you can work fast and lay down an idea for a whole scene or sequence in perhaps a minute or two. Often you will reject some panels and replace them with others, but the effort in redoing thumbnails is nothing compared to replacing larger images in which you have invested a lot of time and work in detail and accurate drawing.

An important bonus also is that you can draw crude thumbnails as fast as you can think. This happened recently when I had been working at the staging of a difficult sequence for my film Carry On.  When the solution occurred to me, I sat down and thumbnailed the whole thing in a couple of minutes.

Here is the original page of thumbnail notes, telling me all I needed to know about what was in the frame, what character it was, which way they were looking, what the approximate camera framing was to be, and in what sequence the shots were to run.

The page of thumbnails, including three that were eliminated.


Later, I could confidently enlarge each image represented in the thumbnails to full size and with all the extra detail that those tiny drawings suggested.

The same basic images, enlarged and detailed.

So whenever you are working out your animation or storyboarding ideas, remember to think small before you think big!

Saturday, January 16, 2016

No. 87, Storyboarding Tips: The Paper Storyboard

Storyboarding


If you are storyboarding your film or video before animating (and you should be!), how are you doing it?  There are some sensible things you might do to make the process go faster and easier.

The first thing is to learn to think cinematically. That is, to learn the language of cinema that has developed over the past hundred plus years, and to use those rules and techniques to help your presentation to be as clear and effective as it can be.

A film maker, whether in animation or live-action, is a storyteller, and there is little point in being able to animate expertly if that work is poorly organized and presented.  I, myself, am guilty of having neglected to give storyboarding it's due in some of my past work. But for much of my career I have worked in the extremely short format of television commercials, works of between 15 seconds and a minute, that were easy to comprehend and whose storyboards might comprise just ten or fifteen panels in their entirety.

Anything longer than one minute deserves all the care and effort at the storyboard stage that you can put into it. And when you are at the storyboard stage, it is okay to put in even sequences that you feel might be cut out later on, because even if you cut a scene at some later time, to get it down in storyboard panels may be helpful in giving you an understanding of your own story and characters. Such a sequence might contribute to what is called a "backstory" for your film, a behind-the-scenes narrative of your characters' lives that can be of help in stimulating the understanding and creativity of voice actors, character designers, animators and others involved in your production--even if all those roles are just you wearing various creative hats.

(For further reading on the subject of the language of cinema,  I recommend Film Directing Shot by Shot, by Seven D. Katz, (Michael Wiese Productions, 1991) and on storyboarding, Prepare to Board, by Nancy Beiman, (Focal Press, 2007.) Many other books on these subjects are also available.)


What Size Paper?


In a future post, I will discuss digital storyboarding; in fact, I use both paper and digital versions together. But today I want to talk about "old fashioned" paper storyboards.

In the days before wide-screen television, you could buy storyboard pads like this one.

There is no fixed size for a storyboard panel.  What should be considered is the screen ratio for your final output. Will it be widescreen or some other ratio of width to height? In my case, I have found that the right size for my finish storyboard panels is half a sheet of animation paper. Full size animation paper is usually 12.5 x 10.5 inches [31.7cm x 26.7cm], so half is 6.25 x 10.5 inches  [15.9cm x 26.7cm]. This is quite close to the basic widescreen ratio of 16:9, actually working out to 16:9.5. This is a nice size for me to work, with images that can be read from several feet away if they are boldly drawn, and it is economical because I just take used animation paper with images on one side that I do not care to preserve, and I tear them in half with a straight edge. (And because I prefer to animate on a premium paper called Ingram, which is heavy and expensive, I like the economy of using this paper twice.)

Full sheet of standard animation paper (used).
The sheet torn or cut in half.
The half-sheets pinned up.  Notice the Acme punch peg holes.

Displaying the Storyboard


Of course, among the advantages of digital storyboarding is its compactness; it does not require any more physical space than your computer screen. This may be a deciding factor for many in not working on paper, and it is a good reason.  If your workspace is confined to a small apartment, a bedroom, the kitchen table, then paper storyboarding is probably more trouble than it is worth.

But if you can--if you possibly can--find or create some place to pin up your drawings, I recommend it highly. I am now lucky in this way.  After years of pinning up storyboards on painfully small corkboards or on the walls of rooms that soon became pocked with the marks of pushpins, I moved into a new home where I reserved an entire wall to be covered with a synthetic material that is made to take pushpins and which closes over the holes when the pushpins are removed. The board is 5 feet high and 10 feet wide [1.5m x 3m].

My dedicated storyboard wall.

In a digital storyboard program such as Storyboard Pro by Toon Boom, you can view your storyboard in a number of formats, from a page of thumbnails to a single panel showing on your screen. But in my opinion, there is nothing like a big board you can stand back from to view the whole thing, or walk up to for a closer view of twenty or ten or even one panel at a time.

A closer view.

You can pace the room while you consider it, turn your head, walk up and re-pin some panels in a different order, make notations and corrections directly on the panels, and conveniently (and dramatically) walk another person through the action that is displayed there.

....................

Next I'll be discussing the Thumbnail (also on paper) Storyboard.

Thursday, January 7, 2016

No. 86, The Value of the Second Draft

There was a time when I was writing novels instead of working at animation.  In that time I was seldom ever 'blocked' in the sense of being unable to move forward.  Early on, I perceived that in the first draft, the point is to get the basic idea down on paper.  Writers who waited until it came out right the first time were the ones that got blocked.

Once you have it down on paper, you no longer have to worry about the empty paper; you can concentrate on fixing what is there.  And almost always, it got better in the second draft.  If it went to a third draft, so much the better.

As a film maker, I feel it is much the same process.  As a character designer too.  As an animator, however, I admit I want to get it right the first time, because of the labor. But in a way, if you plan it right, if you do your thumbnails, if you think it through down to the last blink and breath drawn, then you really have done one draft at least by the time you sit down to really animate.

Here is an example that happened just today. It involves both storyboarding and character development.


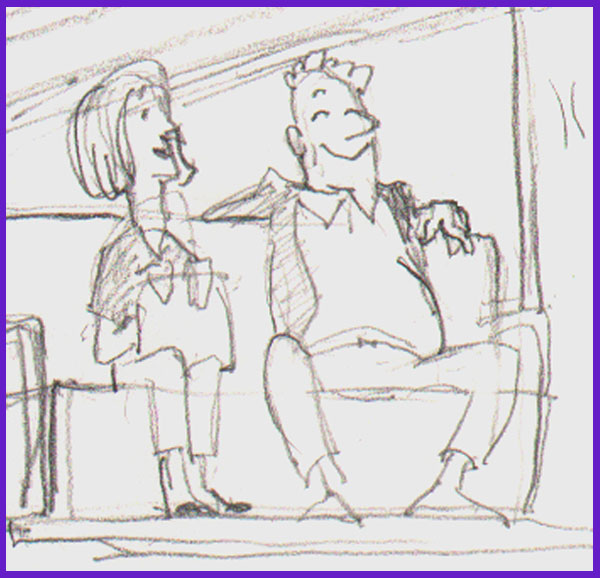
I had made this drawing of an electric airport cart from the rear, showing two passengers riding backward and looking happy about it.  Working on my storyboard today, I redrew the cart to fit my scene; the cart had to be facing left instead of right. Instead of tracing it and flipping the image, which might have been easier in some way, I just redrew it.


As I drew, I thought about the couple riding on the cart, and although they are minor characters, I decided it would be effective to add some contrast and interest by making the woman neat and prim and the man a sort of slob. They are still having a good time together, but now they are not alike.


The man is guilty of what we are calling in America the "subway sprawl", where his legs are spread wide apart in a comfortable but sometimes intimidating way.

The original sketch would have served well enough, but the second one is funnier and shows more character in a single pose, all because, instead of just copying the original, I gave it a second draft.

Next: More about storyboards, including my own Breakthrough!


Monday, December 28, 2015

No. 85, An Exercise in Character Design, Part 3: Within a Single Sheet of Paper

Undo or Erase


As I work on all the phases of animation production, I like to think about what goes on in the animator's head while working--in this case, my own head.

As I have discovered over the past few years in writing this blog, many things are easy to document and demonstrate in my blog posts because the proof of the process exists on paper or in the computer in easily accessed snapshots, including many changes that are made from beginning concept to finished artwork.

But what about those still finer changes that disappear from the world and even from one's memory once they are done?  These are the things we erase either with the undo or delete button on the computer, or, on paper, with a rubber or plastic eraser.  These things are gone forever, aren't they?

Eraser on the legendary Blackwing 602 pencil; "half the pressure, twice the speed."


Perhaps this need not always be so.  A few days ago, while working on a character design for my film, as I drew in pencil, it occurred to me that I could record the things I was about to erase by shooting them with my smartphone camera.  I could photograph an entire sequence of the minute progression of my own creative thought as I drew and erased, drew and erased and drew again.

Certainly this is not something I intend to do very much.  It is a lot of trouble, and it is disruptive in itself of the creative process. (One might imagine an automatic system, a surveillance camera looking  over the artist's shoulder, that would snap a picture every time the artist picked up his eraser.)

But this one time, I did do it, and for whatever it is worth, here is the result.

The first drawings.

The right hand is changed.

The right hand is drawn from the front.  Plus, a new arm is drawn
at the side, experimenting with a different look.

Masking off his right side, I try drawing in the structure
of the new arm on the character's left side.
But I do not like the way this looks; I don't like the hand being hidden by the leg.  Time to try something else...

Here I have designed a new front view hand, at right, and changed
the character's right hand to the same design.
Of course now the side view hand is
out of agreement with the front view, so...
...I redraw that to match in a turnaround.
Next I add a 3/4 view to see how it works with the others.
Looks good!

This was sufficient design for me to begin storyboards. But in the storyboard stage, I tried still other angles and continued to analyze the character design for style and functionality, and I made mental notes for more refinement.  Eventually I sat back down with this same sheet of paper on my board and did my revisions.
The "final" model sheet.  Since I am still in my storyboard phase, other changes are still possible.
Here you will see that I have added facial expressions and more angles of the head.  Also, I decided that he should look a bit more elegant, with a nice if slightly ill-fitting suit.  The jacket is longer, and the limbs are smoother.

The changes I have made here might have been done differently, with new copies of the drawing that incorporated the modifications rather than erasure and redrawing.  Many of these things could easily have been done in the computer, with the multiple stages being preserved in save as copies. But here is how a design can evolve as the artist's conception evolves, all within a single sheet of paper.

.....................

To my readers: I want to remind you that I value your presence on my blog, and I invite you to comment. It encourages me when I get interaction with you.  And for any of you who haven't yet done so, why not also become a Follower? (As I like to say, just because you are a follower doesn't mean you cannot also be a Leader!)


Saturday, December 19, 2015

No. 84, Adventures in Character Design, Part 2: Promotion from Within

In my last post on this subject (No. 82) I speculated that I might find the character I needed among the existing incidental characters in my storyboard of the original concept.

As I looked the drawings over, there was one in particular that I was attracted to. It was a frontal view of an old man, seated and holding his wife's hand.

First sketch of the old man character.


He was intended just as an extra, to be sitting in a row of airport chairs as my former protagonist moved past.  Unlike his wife, he was not even intended to be animated.  But as I looked at him I thought, what could be funnier as the bearer of an immensely heavy suitcase than a frail-looking old man?

Trying him from different angles showed his potential to move in 3 dimensions and allowed me to work out his body and head shapes and proportions.


In particular I needed to work out how he would look dragging his heavy suitcase by a thin length of rope.


Next we'll take a close look at what design changes can take place on a single sheet of paper--changes that are important to the character design process yet are unseen and forgotten steps to the final design.


Saturday, December 5, 2015

No. 83, Locked Out of Linked In Groups

LINKED OUT


Update: as of the new year, 2016, this issue has been resolved (or my period of exile ran out) and I am now able to post to my groups once again.

When you run a blog like this one, you want as many people to see it as possible.  And you don't want just anyone to see it; you want everyone with an interest in the subject matter to see it. Naturally, the greater readership you have, the more responsibility you feel to do a good job, and also the more satisfaction there is in blogging. So, you look for the best ways to get people (in my case, mostly animators) to notice it and take a look and, it is hoped, become a Follower.  Up until now, my best path for that has been the various Linked In groups for which animation is the focus.

Each time I posted to my blog, I would run a notice about it on relevant group sites, and typically I would get a surge in page views.  In this way, I have been gradually building up my readership.

Suddenly, however, I find that I am blocked from free access to those groups.

With a little checking, I found that just one complaint of impropriety, spamming or self-promotion, whether or not it was justified, was enough to get you blocked from a group. But in Linked In, this now pulls a trigger that blocks you from all your groups for an unknown amount of time.  This has now happened to me.  In some cases, my postings to the groups do show up on the group web page, but not in the periodic emails promoting activity in the group. On the internet, discussions of this problem by others who have felt unfairly blocked have revealed no good solutions or effective avenues of appeal.  One person suggested appealing to the group moderators, but many groups now do not list their moderators and their contact information, and anyway this would not clear the other blockages that have been automatically triggered. And Linked In has no editors or supervisors to whom to appeal for a review of one's situation.

As to the nature of my postings, are they inappropriate? Certainly not; they are targeted to the very narrow-interest groups most likely to want to see them, and their content is as free of socially questionable material as I can make them.  And also they are most definitely not spam, unlike the recruiting and job help postings that have been clogging group emails since I began my blog.

And what about self-promotion? Well, of course it is self-promotion, but no more so than a post by a young animator who wants people to look at his or her demo reel or animated sequence.  In fact it is less so, because my blog is informational and instructional; it is possible sometimes to learn something from it that may help a less experienced animator to improve his skills or to avoid some mistake in approach or execution.

 There may be another avenue open, such as Google Communities, or perhaps I will get reinstated sometime. For now, I am flummoxed.


Tuesday, December 1, 2015

No. 82, Adventures in Character Design, Part 1: Looking for My Character

What to Do when an Idea Isn't Working

Recently I came to a place in the planning of my new personal film where I felt blocked.  The concept was of two characters having a confrontation in an airport, and as I tried to commit the whole thing to storyboard, my progress and enthusiasm ground to a halt.

The original main characters.

I expressed this to a close friend who is also an animator, and he just shrugged and said, "Well, maybe there is something wrong with the whole idea. Rethink it."

Immediately I felt re-energized. And I also felt relief, because I was keeping with my new resolve not to animate anything without first storyboarding to the end. So I had not wasted a lot of work.

I began sorting through the ruins of my concept like a man standing amid the tornado-riven rubble of his home, looking for what might be salvaged.  There were some good character designs, and there was the airport location. There was a gag about an oversized suitcase that couldn't possibly make it past airport security and size regulations as a carry-on.

Part of the ruin was what had been my main character, a goofy guy who was funny-looking but hard to understand or empathize with, even for me. He was the one with the suitcase, and now I saw that he had to go, and he had to leave the suitcase behind.

Keep the suitcase, lose the guy. These are my first sketches of the character, from a traveling notebook.
 But what could I replace him with?  Was it necessary to start over with that, too?  Or was there possibly something already there?

Next: A New Start