Pages

For People Crazy About 2D Animation!

Acme Punched! is for people crazy about 2D animation. It may be enjoyed by beginners and others, but it is aimed at animators who know already something about the process of animation and the basics of character animation. In large part, it will attempt to provide a deep look into the problem solving that goes on in my head as I work out a scene, often in step-by-step posts that I will sometimes enter in "real time", without knowing in advance what the outcome will be. Mistakes and false starts will not only be included but emphasized, so that the creative process of animation will be portrayed realistically. And, while my own bias is for 2D drawn animation, many of the effects and principles discussed here can apply to CGI 3D animation as well. I hope the blog will prove useful and instructive for all.

-Jim Bradrick

Monday, March 18, 2013

No. 34, Problem Six: Fox Bites Nose (Part 2)

The Most Creative Step


Animation is a strange artform.  The process of production is so complicated, and the road to the final result so long, that it seems that the ember of inspiration might darken and grow cold before the animator ever gets to the end.  It is miraculous that an animator can hold and keep alive in her or his imagination that glowing spark through all the tedious stages it must endure: the timing calculations, the planning of layers, the process of construction and refinement of drawings, the endless adjustments and revisions.

And yet, we do.  It is the thrill of making it work, of making it seem to be alive, despite all the technical encumbrance, that keeps us going on to the end.

This post describes as best I can one of the high points of the journey.  This is the magic moment in the process when the animator sits at his drawing board and makes the key drawings upon which all else depends.

As we discussed in Part 1, my first attempt for this scene was wrongheaded in just about every way, and it was largely because I tried to handle the three characters separately from one another.  This was okay for the first part of the scene, described in Problem Five, where the woman is watching as the man lowers the fox down from atop his head.  After that it was a failure because the three characters were acting in concert and they needed to be regarded as one combined entity, rather than as separate elements.

At this time I have made sixteen new drawings spanning the entire scene.  The first eight depict the woman's behavior during the action covered in Problem Five, as the man reaches up and lifts down the fox.

The last eight drawings show all three characters together, as the fox bites and holds onto the woman's nose and she and the man react to that.

Let's look at the drawings.
Dwg 1.  She has been watching the thing on her husband's head turn into a fox.


(Drawing 2, formerly in this position, has been removed, to be replaced by Breakdown Drawing 65.)

Dwg 3.  The peak drawing of the take.
Dwg 4.  Hold drawing at end of take.
Dwg 5.  As the fox is lowered down, she pulls back out of the way.
Dwg 6.  Now she leans in for a closer look.
Dwg 7.  She turns to look at her husband.  Her head is on a separate layer here.
Dwg 8.  She turns back to the fox and tickles him under his chin, and then...
Dwg 9.  He snaps his jaws closed on her long nose.  She winces in pain.
Dwg 10.  Reflexively, she starts to jerk away.
Dwg 11.  But the fox hangs on.
Dwg 12.  The peak extreme of her action.
Dwg 13.  Realizing she must not resist, she yields to the fox.
Dwg 14.  Coming down, she looks to her bewildered husband...
Dwg 15.  ...who turns his attention to the fox.
Dwg 16.  Now they are at stalemate.
Note that these drawings are by no means evenly spaced throughout the scene.  They are the storytelling drawings.  Where there is more going on, there is need for more drawings.  Here, drawings 9 through 15 cover just 64 frames of time--a little more than 2 1/2 seconds, because that is where the violent action is.  In fact, drawings 9, 10, 11 and 12 are consecutive; there will be no inbetweens added there.  It may be unusual to consider them all as key drawings, but they were key to my understanding of the movement, and as I felt their structure so strongly, I thought it necessary to do them all at this time.  It was a tricky section that had to  be proved out, and I deemed them essential.

In Part 3, we will look at the pencil test/animatic of all this movement together.

Next: Pinning Down the Timing

Wednesday, March 13, 2013

No. 33, Problem Six: Fox Bites Nose (Part 1)

Well, it has happened again.  My Director (me) has just come by and dropped onto my desk all the drawings from the end of this scene with the fox.  All he said was, "You can do better than this."

At first I was angry.  All that work for nothing!  But the animator (me again) calmed down and took a look at the pencil test.  This is part of the whole sequence where the man pulls off his hat, revealing the fox underneath, then lifts the fox down for his wife to see.  All that has been the subject of the Problems 2, 3 and 5.

Now the wife leans in to see the fox.  As she tickles his chin, he suddenly seizes her by the nose.  Instinctively she jerks away, but not too hard, for she doesn't want to lose her nose.  Holding the fox, the man also reacts, yet he cannot just pull the fox away.

I had animated everything described above, and it was clear what was going on.  Yet as Animator, I had to admit: it just did not work.

Here is the pencil test:

I have to say, I am embarrassed now to even display this video on my blog, it is so bad.  Yet as I have stated, part of the idea of the blog is to show you my mistakes and how I am correcting them.  This is one of those times when I am taking a chance, because as I write this, I have not yet fixed the problem, so I cannot be sure what I will create to replace the mess I have made.  (But yes, I have already roughed in a new set of key drawings, so I do have some idea of what direction I will go.)

First, let's try to analyze what I did, and why it is so wrong.

Here is what happens in the scene:

1-The wife moves in.  She tickles the fox.

2-The fox bites her nose.

3-She jumps.

4-The man does a "take", reacting in surprise.

5-The woman moves into a pleading attitude, hoping that the fox will let her go.

 And so it goes, 1-2-3-4-5.  The result?  It is boring.

The Failure To Visualize


My first mistake was the biggest mistake you can make as an animator: failing to envision what the scene should look like, or what it should feel like.  In any animation, but particularly in a pantomime like this, it is all important to have a good idea where you are going before you try to go there.  Even with something quite complex, a good animator should be able to close his or her eyes and "see" the action, at least to the extent of its timing and power.  I had not really done this.  I had analyzed the scene intellectually, and I had broken it down into five separate components and then had animated each one, separately.  In cases where the characters are not closely engaged, this can work.  But in the present instance, the three characters are not only closely engaged, they are actually physically connected!

Once the fox takes hold of the woman's nose, the three characters have become one moving mass.  In the language of computer graphics, they have become grouped.  It therefore no longer makes sense to try to animate them separately; they must now be animated as a group.

Also, I had a mistaken notion that the fox's head should not move after he takes hold of the nose.  I thought it would be funnier if the others moved all around the fox, and he didn't.  Well, I tried that, and it obviously did not work.

The New Vision


This kind of group movement is well known to veteran animators, and once you get the idea, it provides an avenue to good results in scenes where two or more characters are locked together in combat, for example, or where a group of characters all react to something, where the reaction moves through them like a wave or surge.  Many of the dwarfs' scenes in Disney's Snow White make use of this approach to great effect.

Group movement is also discussed in some detail on pages 364 and 365 of Illusion of Life, the Disney animation bible by Frank Thomas and Ollie Johnston.

Next: My New Approach


Sunday, March 3, 2013

No. 32, Problem Five: Bringing the Fox Down (Part 4)

The Answer


If you haven't figured it out, the problem to which the Director was referring  was the spacing of the drawings.  Specifically, the fox images in drawings 87 and 89 did not overlap each other at all; nor did they overlap the adjacent drawings 85 and 91.  Generally speaking, overlap of shapes in animation creates smoothness in movement, while lack of overlap makes for the jittery look called strobing.

In live-action and, now, in computer generated animation, this is compensated by blur: by a softening of the edges that happens naturally in live action photography and is simulated in the computer.

With our old fashioned 2D animation, however, we can make use of one of four traditional solutions for this problem:

1. We can simulate blur with streaks or speed lines that trail along behind the moving character and accent the arc of movement.

2.  We can add multiple images to a single drawing.

3.  We can use the smear technique as made famous by Chuck Jones in "The Dover Boys."

4. Or lastly, we can simply go on one's--one drawing per frame--and add a couple of drawings that will provide the needed overlap.

There is an additional technique now available to me in Toon Boom Animate Pro, which is the ability to add a blur effect to any drawing.  I have not yet experimented with this however.

In a future post, I will demonstrate all of these different solutions, but in this particular instance I decided to use number 4.

Before Adding New Drawings


Here are all the original drawings of the movement slowed down, with each drawing exposed 12 times rather than 2 times, so that the spacing can be clearly seen:
Note the great distance that the middle drawings, particularly 87 and 89, have to travel.  There is almost no overlap of the fox's head with the adjacent drawings.

After Adding New Drawings


Here is the same sequence with two new drawings (86 and 88).  Now 85 through 88 will be on ones, so in this slow-motion demo, each of those is represented by 6 exposures instead of 12, while all the others are on 12's as before.
Now you should be able to see that the spacing has a lot of overlap of shapes, thus smoothing out the movement and minimizing strobing.

The New Sequence At Full Speed


Here now is what it looks like at full speed, using 2's and 1's as planned:

As always, if anything about the above is unclear, please send me a comment and I will try to improve upon the explanation.

One more thing I want to mention is that when I examined the arc of movement of the original drawings, I determined that one of them--number 87--was seriously out of line with the arc.  Before shooting the above tests, I corrected that drawing.  The correction is illustrated below:
The red outline shows the original positioning.


Next: Adding More To the Scene


Tuesday, February 19, 2013

No. 31, Problem Five: Bringing the Fox Down (Part 3)

Adding the Fox Himself


Last time we saw the fox, he was nothing more than a rough stand-in looking like a bad drawing of a stuffed toy.  Let's see that again:
Scene 13_3

Thinking about what the fox might do as I looked at this test, I immediately had some wild ideas.  Although I had basically kept the man's head upright and steady, there was some movement and even a little tilt.  This is something I could have some fun with, I thought, and I did a few thumbnails.  Here is one idea:
But then I, as Animator, knew what I, as Director, would say.  (It was as if he and I were the same person!)  He'd say, "There isn't really time for this much action, and furthermore, you don't want the fox upstaging the movement of the man.  You have to tone it down, and keep it simple!"  And he would have been right, of course.  Also, I realized that this kind of thing was out of character for the fox, whom I had begun to see as Mr. Cool.  Like Bugs Bunny, this fox is usually in complete control.

I went to work then animating the fox.  There were a few tests and adjustments, because it can be more difficult to animate with restraint than with wild abandon.  But finally I felt I had what I wanted.  Here is the test I next presented to the Director:
Scene 13_5

So, the fox reacts to the movement, but he remains seated and basically unruffled until the man picks him up.  I thought it was a good solution, and the Director agreed.

"Yes, I think you've got it here!" he said with enthusiam.  

And yet I was still worried, because he kept running the test over and over, staring intently at the screen.  Then he started looking at the ending frame-by-frame, until finally he turned to me and said, "There is something you might do..."

"What's that?" I asked, finding it hard to keep the annoyance out of my voice.

"Oh, it's just a little thing, but I think it will be worth doing.  Look, I'll give you a hint.  It's something between drawings 83 and 91 that you could improve. Take a look and see if you can find it."

We sorted out the five drawings he mentioned and spread them on the desk.  They showed the middle of the arcing movement where the man brings the fox down from his head to waist level.  Here they are:
Drawing 83

Drawing 85
Drawing 87
Drawing 89

Drawing 91
I use the Disney-based system where drawings exposed on Two's are given odd numbers.  Thus, if you saw an even-numbered drawing, like 2 or 4, you would know it was a "One."

"Can you see what I am talking about?" says the Director.

"Uh, I'm not sure," I say.

"Let's look at them another way then," he says, and proceeds to stack all five drawings and peg them to an animation board, turning on the light so that we can see all five images at once.  That looks something like this:
I have added partial outlines in color to make the spacing clear.

"Do you see what I'm talking about now?" the Director says.  "Do you know what you ought to do?"

I smiled, nodding my head, and I went back to my drawing board to do what was needed.

 Do you know what the Director was talking about?


Next: The Answer


Sunday, February 10, 2013

No. 30, Problem Five: Bringing the Fox Down (Part 2)

Approving the Timing


Soon I was back with most of the drawings roughed in, and the Director and I looked at this second pencil test.

Scene 13_2


"Oh, this is coming along!" the Director says.  "The timing is looking pretty good."

I felt good about it now.  The timing did look good, I thought.  Still, I yearned to see the smoothness that I knew it would have with all the inbetweens there.  I went back and added them in, then shot another test.

Scene 13_3


At this, the Director only shrugged.  "No surprises here," he said.  "Yeah, it looks nice and smooth, but I knew that it would."


[I want to add a note here to explain how a pencil test for timing can be shot without all planned drawings present.  Suppose you have a section showing the first 9 drawings, with 1 and 9 being the extremes, as in the spacing chart below. 

Spacing chart for drawings 1 through 9


 In the pose-to-pose mode, you would have done those first, of course.   Then the breakdown, number 4.  Then the major inbetweens, 3 and 5.  That leaves drawings 2, 6, 7 and 8 undone.  To shoot a test without these, you have to compensate for the frames of the missing drawings.  So if all these movement drawings, 2 through 8, are meant to be exposed for 2 frames each, then you would expose drawing 3 for four frames, addiing in the frames that will belong later to drawing 2.  On the other end, you expose drawing 5 to include the frames for 6, 7 and 8 as well, or 8 frames.  Thus, whether or not you shoot just 5 drawings or all 9, the total will add up to 18 frames or exposures, and so the overall timing effect will not differ.

Note: Frames for drawing 2 were added to drawing 3, the succeeding drawing, while frames for drawings 6, 7 and 8 were added to drawing 5, the previous drawing.  This is because we don't want to add either amount of frames to the extremes, 1 and 9.  The reason for that is that you want to be able to clearly judge the impact of the extreme pose as planned, and the inadvertent addition of 2 to 6 frames could affect that judgment.]


Now back to our conversation between me, the Animator, and me, the Director...

I thought about it a minute and then I knew what he meant: adding a few missing inbetweens did not change the essential timing, which has to do with how long a pose or action is stressed, or how slow or fast something happens.  All that information had been available in the first test (Sc 13_2).  Adding all the inbetweens was only finessing what already had been stated.

Now the Director said, "You know what I want to see next, don't you?"

"The fox, I guess."

"That's right.  So far, the fox looks like a stuffed toy.  And that's fine, because the man's action here is the important thing, and you had to get that right.  But now I want to see you turn your attention to the fox and make him as alive as the man."


Next: Animating the Fox

Friday, January 25, 2013

No.29, Problem Five: Bringing the Fox Down (Part 1)

This new animation problem is a fascinating one for me; I hope that you will find it interesting as well.

Once again, my director (me) has called me, the animator, into his office to discuss a scene I have turned in.  Together we review the pencil test. It is the scene right after Problem Four, where the fox, atop the man's head, has shaken himself out.  Now the man lifts the fox down from his head.


"What do you think of it?" the director asks.

"Umm, well, it certainly has to be changed because of the man's attitude at the beginning.  He was apprehensive about the fox's moving, but now he is just amused.  We have to match the two scenes."

"Yes, there is that," the director says, "but there's more.  Jim, I want you to do it again, start from scratch.  Don't even look at the old drawings.  When you get your extremes and maybe a few key breakdowns done, test it again and we'll look at it together."

A day later, I am back with the new test.


"Well, this is a lot different, isn't it?" says the director.  "You've really got a lot more acting into it."

I had, in fact, thought it through much more thoroughly.  Now I had the man playing to his wife, rather than worrying about getting the fox down, and the key drawings were more dynamic.  I had worked in the Z-axis, too, moving the fox close to the camera as he comes down.

"Okay, now go ahead and rough in more of the drawings, so we can look at your timing."


 Next:  Two Versions More

Monday, January 21, 2013

No. 28, Problem Four: Forty Seconds In Two Weeks (Part 4)

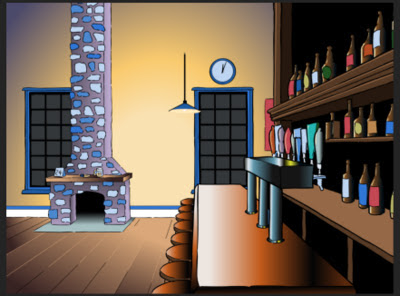
After inking the scanned drawings, I blocked in the color with flat fills in a monochromatic palette, then began working up the final colors in both flat and gradient fills.  Here is an early version of the bar, with many elements still showing in various shades of flat blue.


Next is a screenshot with more detail and color worked out; the beer labels, seats and beer pulls have been done.

And here is the finished artwork of the same scene.  The fireplace is done and the lamp cord extended.

Next, a shot of the mantle closeup with all the props in place.

Below is the master background for Scenes 3, 5 and 7.  Notice the wreath, shown as a scanned line drawing in Part 3, now in place above the fireplace mantle.  This is a completely new rendering of the fireplace and floor, but the back wall with windows, clock and poster is reused from the bar shot.
You will also see in the shot above that one of the hanging lamps is lighted; it is supposed to be the only light source in the room.  Due to time and budget constraints, I decided to not put in any cast shadows.  These would have added to the drama and effectiveness of the lighting.  For example, the wall just to the left of the fireplace would have had a strong shadow cast by the column of the fireplace itself, and the objects on the mantle in the closeup would have cast shadows off to the left.  However I was able to get a pretty good effect with gradients indicating the source of the light.

Finally here is one more still shot showing the "beauty shot" of the fermenter for Scene 7.  The fermenter was modelled using multiple gradients, and on the conical lower portion, the gradients were set at various calculated angles to fill a series of wedge-shaped areas.  The client was pleased with the result.

Each of the seven scenes I made into a separate Animate Pro file; this is always recommended to keep layers and file size manageable.  Putting all your scenes in one file can otherwise be a nightmare to work with, partly because the timeline becomes so long it it hard to navigate.

My part was now about done.  I exported each of the scenes into a folder of png frames and sent them to my partner,  Don, for assembly and post production.  Because he had a plug-in that would create a good snowfall effect in Adobe After Effects, I had left the window panes transparent, and the png format supports the transparency.  Don then brought all the scenes together in Aftert Effects, added the fades and dissolves, and put in the snowfall effect both behind the windowpanes (for which Don requested a snowbank background to match the snowbanks in the exterior shot) and in the opening exterior shot itself.  There were some technical problems with the transparencies, but finally it all came together visually.  Don then added music, sound effects and the closing logo and titles, staying up most of the night since we were a day behind schedule.  He delivered the finished movie about noon the next day.


And now, all done in about two weeks time, here is the final 40-second movie:
 

Next:  Problem Five: The Fox Comes Down