Pages

For People Crazy About 2D Animation!

Acme Punched! is for people crazy about 2D animation. It may be enjoyed by beginners and others, but it is aimed at animators who know already something about the process of animation and the basics of character animation. In large part, it will attempt to provide a deep look into the problem solving that goes on in my head as I work out a scene, often in step-by-step posts that I will sometimes enter in "real time", without knowing in advance what the outcome will be. Mistakes and false starts will not only be included but emphasized, so that the creative process of animation will be portrayed realistically. And, while my own bias is for 2D drawn animation, many of the effects and principles discussed here can apply to CGI 3D animation as well. I hope the blog will prove useful and instructive for all.

-Jim Bradrick

Wednesday, November 14, 2012

No. 20, Drawings Into Digital: Part 2--Inking

The scanned drawings are imported as batches into the timeline, all the drawings of each level to a new layer. The timing will be worked out later.  In my case, I have already worked out the timing in the pencil tests I did in Toki Line Test, so I will refer to the Xsheet from that when  spacing the drawings.

Here is what the timeline looks like after the  drawings are imported:

There are five layers of drawings showing here: Man, Tail_Behind, Body (the fox's body), Tail_infront, and Fur.  Above each of these layers I have created a drawing layer with the same names repeated, but in capital letters: MAN, TAIL-BEHIND, BODY, TAIL_INFRONT and FUR.  These are the layers I will be inking on, tracing from the layer below.

Note: I should mention that what I describe here is my own system.  Of the kinds of animation it is possible to do in Animate Pro, Toon Boom provides the least information and guidance about importing completed animation drawings.  No doubt this is because it is the least popular type of animation among its user base, so there is less demand for technical help, and because animators who can do all their animation on paper before entering the program usually know what they are doing.

At any rate, the drawings here are arranged in ascending number order in each layer, but the drawings of one layer do not yet have any meaningful relationship to the drawings of another layer.  For example, drawing 1 of the Body layer is meant to be held for many frames, but until it is inked and painted it will occupy only one.

I now begin the inking process, which looks like this:

The red frames on the layer BODY are the inked frames of the layer Body, directly below.

I have chosen a style using two weights of brush line, which are basically the default brush 2 and the default brush 3, although I have changed the property values of each somewhat.  Brush 2 gives a thin line without much variation, while brush 3 has a heavier line with a lot of thick and thin variation.  You will want to experiment to get the right amounts of Minimum and Maximum Size, and of Smoothness and Contour Optimization for your own purposes.  On the fox character I am using brush 2 for interior lines and anything else that is of a delicate nature, like the outlines of the lower legs.  Brush 3 is for everything else.

Also because I like the look, I am allowing the line to break, or to not always connect with other lines.  This will necessitate a lot of work with the Stroke tool, which adds invisible lines to connect these gaps.

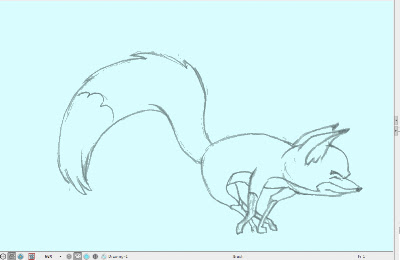
Here is a closeup showing the inking being applied over the bitmap scanned image.  The scan was at 150dpi.  It is blurry and I was forced to refer frequently to the actual pencil drawings to be able to make out some details.

Since scanning these, I learned through an exchange on the LinkedIn group Animation Community Platform that I could be scanning my drawings vectorized rather than bitmap.  Here is an example, showing the much higher quality:
A grey mode vector scan, this time over a blue color card.
The vectorized scan also gives me alpha transparency, which the bitmap image does not.  I will be using this type of scan from now on.

Next: Closing the Gaps


Thursday, November 8, 2012

No. 19, Drawings Into Digital: Part 1--Scanning

Paper To Digital: Getting Started


Having cleaned up all drawings for this scene in black pencil, next I scanned them into the computer for "ink and paint", the old expression for getting the drawings into final line and color form on a transparent field, just as in pre computer days they were actually inked onto acetate celluloid, their colors painted in on the back of the cel.  I have actually done this, and as an independent animator I mean that I--not some employee or underling--have actually done it.  Mixing paints, doing test cels to get the right colors, doing let-downs (compensating for the gray density of each cel by lightening the paint colors incrementally, so that the parts of one character on multiple cel levels would all appear to the camera to be the same color and value), waiting for the paint to dry, repairing damaged cels where the paint turned out not to be dry, and so on.

All that is in the past, and I am glad to embrace what computer animation can do in this area.

First step is scanning, and I recommend the ScanExpress A3USB 1200 Pro Scanner by Mustek.  It costs under US$200 and scans up to 11.7" x 16.5" (29.7cm x 41.9cm).  I learned about this scanner from a comic book artist friend and was excited, because all scanners I knew about  that scanned any larger than American legal size (8 1/2" x 14") were priced in thousands of dollars.

The Mustek ScanExpress 1200
This scanner works in a wide variety of resolutions and scanning modes, and it can batch-scan 10 copies at a time. I access it through Photoshop, where the scans appear in a stack.   For mode I choose Grey.  In this way I get all the shadings of the pencil drawing, which I like to see when inking over them digitally.  But it is possible to also scan in color, at either 16, 24 or 48 bit.  Color scans of animation drawings may be useful when colored pencils have been used to code such things as match lines or  tracebacks,  or to indicate a particular inking color.

When scanning pencil animation drawings, registration is of course critical.  Unregistered drawings can be troublesome and time-consuming to correct.  And it is important to know that acme or other registration holes are not always consistent in their relationship with the edges and corners of the paper in which they are punched.  Therefore, even the most careful alignment of drawings into the corners and edges of the scanner bed will not assure registration.  The three registration holes may vary in their location from sheet to sheet by as much as 1/8" (.3cm) from the edge; moreover, they may be skewed--not level with the edge.  These variations are unacceptable and can ruin your animation or cause you much grief in their correction.

Toon Boom Animate Pro, as well as some other animation apps like Toonz, offer a peg hole detection feature, which automatically aligns your scans by their peg holes.  But to use this feature, one must scan in the Lineart mode, which produces an over-simplified rendering of the pencil drawing that I do not favor, all black or white with no values inbetween.  It also has low tolerance for any enlarged or irregular holes and can fail as often as not, in my experience.  In any case, as I prefer to see the bitmap nuances of the pencil drawings, this does not work for me.

Perhaps a better option is to equip your scanner with a pegbar.

A standard thin metal acme pegbar taped to frame of the sccanner bed, just outside the scanning field.
This will work very well for registration if 1) the specified scanning field is exactly consistent throughout the entire scene being scanned, and 2) the pegbar is taped down securely enough that it does not drift or shift its position in any way.

The Mustek scanner actually appears to have been engineered with this possibility in mind, as the inside surface of the scanner cover includes a slot all along its right side that will accomodate the acme pegs that project up from the pegbar.

Here an animation drawing has been placed face-down on the pegs of the scanner.
For this scene I scanned all the drawiings at 150dpi.  Even this rather high resolution does not show absolutely all the pencil detail once the drawings are imported into Animate Pro, so on certain critical scenes I will probably choose a resolution of 300dpi.  I would say that 72 or 96dpi would tend to be inadequate at any tiime.

Next: Inking the Drawings in Toon Boom Animate Pro.
Sunday, October 28, 2012

No. 18, Rare Animation Books: Animation in Twelve Hard Lessons

The cover of the book, its title drawn in so ornate a style that one can hardly read it.
Animation in Twelve Hard Lessons was first published in 1972 by the author's own company, Robert P. Heath Productions, of Tampa, Florida.  I think I got my copy about 1980, and in those days before the internet, it is probable that I saw an ad for it in the catalog of Cartoon Colour Company of Burbank, California, which is still in the business of selling animator's supplies to this day (including, I must mention, animation paper which is acme punched.)

Bob Heath's one claim to fame was that he animated the short cartoon "The Critic" for Pintoff Productions.  With comic narration by Mel Brooks, this cartoon won the Academy Award for Best Animated Short Subject for 1963.

Heath subsequently ran his own animation studio and developed the book during this time.  Originally it was designed as a correspondence course, which means that students would enroll by mail, receive lessons by mail, and send in their work and receive corrections and comments by mail.  Complete the whole course of work, and you get a certificate of completion.  It is the same idea as was successfully carried out by such schools as the well-known Famous Artists School and is similar in concept to the online courses available from independent schools today.  However, I don't know if it was ever actually offered to the public as a correspondence course, or only as the book that came into my hands.

It was a large format book, 11" x 14" (28cm x 35.5cm) and 142 pages long, and it offered a practical education in basic character animation in a "limited animation" character design style that was fashionable in the 1950's and 60's,  more UPA than Disney.  After some introductory material about equipment, the 12 lessons included three on inbetweening, two on assistant animation, one on general animation, and then a chapter each on animation pans, the animation camera, tricks of the trade, animation actions, working with animation, and technical animation.

Each of the 12 chapters had exercises or problems to be solved, and each had solutions to its problems provided at the back of the book, thus maintaining the lesson and answer structure of the correspondence course.  My copy of the book is somewhat mutilated because of the necessity in doing the lessons of cutting up the pages to remount the drawings in register on animation paper.  But I have kept all the material together and haved taped the pages back together so that today I have virtually the whole book.
A typical page of illustrated instruction from Animation in Twelve Hard Lessons.

Personally I never completed all the lessons because by the time I got Animation in Twelve Hard Lessons, I had already learned many of these basic lessons elsewhere.  I don't know how many animators benefitted from this book, but I believe a person who had absorbed all its information would have been qualified for at least an entry level position at any studio producing animated television commercials in its time.

In addition to the book, I purchased at the same time the animation disc offered by Heath Productions.  It was manufactured of molded particle board with a frosted glass inset panel and movable Acme peg bars of black plastic with metal pegs.  I used this disc until I replaced it with the much cooler and more expensive aluminum disc I still use today.
The Heath Productions animation disc.  The only way to lock down the sliding peg bars was to tape them down...but it worked!
Although this book is long out of print, as of this writing there are several American booksellers offering used copies online.

Next: Getting Your Paper Animation into Toon Boom Animate Pro.


Tuesday, October 23, 2012

No.17, Problem 3: The Fox On the Man's Head (Part 6)

Head To Tail: : Putting It All Together


Because I have up to four layers here in the pencil test, I took the time to clean up all the drawings in black pencil so you will get the clearest possible view.   Here is the result.

This is about how I want it.  I will add  a couple of eye blinks to the man, but I will do this on the fly, in Toon Boom Animate Pro.  I will also add a camera move at the end, trucking in on the fox as he sits down.

This scene is ready to be inked and painted, and I have decided to go ahead and do that so you can see the final result and get the full production picture of a scene from rough pencil tests through final color.

This will take me a while, so in the meantime I will do a few posts on rare animation books you may never have even heard of.


Next: Animation In Twelve Hard Lessons

Monday, October 15, 2012

No. 16, Problem 3: The Fox On the Man's Head (Part 5)

The Breakout of the Shakeout


Before we get back to the tail, I thought you might like a close look at the drawings involved in the fox shaking himself out after being matted down beneath the man's hat.  It involves drawings on both 1's and 2's, and also the use of multiple images.

Here again is a look at this portion of the sequence at full speed.  I remind you again, we are at this point ignoring the tail, which will now be on its own layer.


Now here is another  version of the same drawings, but this time with enough frames exposed for each that you can observe every drawing and its relationship to the others.


Up through drawing 61, the drawings are all exposed on 2's, with 61 itself being held for 4 to stress the anticipation.

Then 55 through 78 are on 1's, after which we return to 2's with 79 through 85.

The drawings with two heads each--66, 69, 72 and 75--are used where the fox whips his head across from one side to the other, spanning a distance where there can be no overlap of forms of the head.  In such a situation, some artifice is usually advised to help the viewer bridge the gap between the widely spaced drawings.  This might be a blur, a smear, a trail of speed lines arcing across, or, as in this case, the use of multiple positions of the moving object on one drawing.   (Note: The trailing heads on drawings 69, 72 and 75 are drawn in red only to make them stand out in the pencil drawings from the blue lines that they cover.)

Note that the head in the drawing following each of these is very closely related to the forward head of the multiple drawing; it is advanced just a little more, and the ears continue forward in a follow-through.

Mine is only one way that this might have been done.  There are many ways of convincingly  animating a quick motion like this, and therein is the joy and intrigue of animation, that although it is possible and useful to work with formulae, one may also invent something new that may be more effective than the old. 


Next: Tail and All: The Full Scene Put Together


Tuesday, October 9, 2012

No. 15, Problem 3: The Fox On the Man's Head (Part 4)

Shakin' It Out


Before doing the rest of the tail, which after all is a follow-through item, I needed to finish all necessary work on the body, lest the tail end up wagging the fox.

The two unresolved elements were: 1) how the fox sits down after shaking himself out, and 2) how his bristly fur settles down, and what kind of timing that called for.

Sitting Down

Previously I had only done key drawings.  Now I added in my inbetweens and got this:
This was good in most respects, but I thought the head turn, where he looks down, should hold longer.  (Remember, we are more-or-less ignoring the tail for now.)

I altered the timing so that he is looking down for 8 frames instead of two.  Here is how that looks:
Much better, and I am now ready to look at it together with the shakeout that comes before.  Also I now add detailed drawings showing his fur, which is all bristled out after the violent shake, settling down as he goes into his hold.

Here is all of that together:
All seems to be working.  Yet to do is the final timing, mostly on its own layer, of the tail itself, and then a test of the entire combined scene.

But first...

Next: An Analysis of the Shakeout Drawings and Timing

Friday, September 28, 2012

No. 14, Problem 3: The Fox On the Man's Head (Part 3)

[First, an apology to my readers for the long time between posts.  The fact that I was busy with other things does not mean anything when you feel that the blog you are reading has gone dead.  I intend to try to post at least twice a month, and more often if possible.]


Here I want to work on the beginning of the Fox's unwinding, slowing it down, making it more interesting, and making sure it works well with the little "take" or reaction  of the man to the tail movement.

Therefore I will only be showing the first part of the scene in this post.


Here is the first pass at improving the start of the unwind:


I feel this doesn't work as well as it might because, although I have added some drawings to the tail movement to slow it down from the original, the man's reaction still distracts from the more important movement that I want the viewer to observe (that is, the fox shaking himself out).

What else might be done here?  What else is in our animator's toolbox?   Well, it occurs to me that I could add an anticipation to the tail unwinding.  This would not only make the movement more dramatic and suspenseful, but it would also add the extra time to the movement that I am looking for.

So I erase those few drawings--they are simple ones and not hard to replace--and begin again with a snappy anticipation.

Here is how that looks:

Okay!  I am happy with this; it is exactly the effect I wanted to achieve:
-The man's reaction seems to come at a natural time, as soon as he feels something moving.
-The anticipation works well to draw your attention to the tail, and it lasts long enough that by the time the man has come to rest, the viewer is ready to focus on the main business of the fox unwinding, and he hasn't missed anything important

A note on the anticipation:

I want to draw your attention to something a bit unusual about the anticipation.  Here are the key drawings: 1, 13, 17 and 25, shown with 2 spacing guides.

Note that I use Disney-style numbering, where the drawing numbers are also frame numbers whenever possible.  Thus, if drawing numbers are all odd numbers, it means the drawings are being shot on 2's.  (This technique is best described  by Richard Williams in his book The Animator's Survival Kit.)

Drawings 1 thru 13 comprise the actual anticipation--the movement that telegraphs and often opposes the forward movement.  Nothing unusual here; as the spacing guide shows, we ease out and ease in.

But I have dwg 13 hold for 4 frames (at 24 frames per second), so that the next drawing and number is 17.  Again, there are no drawings between 13 and 17.   This gives the movement its snap.  Also, I am playing with the apparent variable volume you get with hair or fur, where it can appear to be a smaller mass when wet or otherwise compressed.  Therefore 17 shows the hair suddenly all spread out.

The remaining inbetweens that fill in between 17 and 25 are a conventional ease in as the tail fur collapses down again.

Next:  Shakin' It Out