Pages

For People Crazy About 2D Animation!

Acme Punched! is for people crazy about 2D animation. It may be enjoyed by beginners and others, but it is aimed at animators who know already something about the process of animation and the basics of character animation. In large part, it will attempt to provide a deep look into the problem solving that goes on in my head as I work out a scene, often in step-by-step posts that I will sometimes enter in "real time", without knowing in advance what the outcome will be. Mistakes and false starts will not only be included but emphasized, so that the creative process of animation will be portrayed realistically. And, while my own bias is for 2D drawn animation, many of the effects and principles discussed here can apply to CGI 3D animation as well. I hope the blog will prove useful and instructive for all.

-Jim Bradrick

Monday, December 26, 2016

No. 116, Maquettes, Physical and Digital

My Need for a Maquette

Sometimes as a 2D animator who imagines his characters in three dimensions, I have resorted to creating a maquette when confronted with difficult angles or points of view. Maquette is a French word to describe a small scale model or sculpture, usually employed as an aid to the creation of a larger work of art. It is a sketch in 3D.

The goldsmith and architect Brunelleschi created a model of his
Duomo that was 5 feet high (1.5 m).

Sculptors like Rodin created maquettes in clay of some of their concepts before carving them from stone on a much greater scale. The pioneering architect Brunelleschi made a model of his great duomo which became a guide for his workmen as they built the famous landmark church in Florence. (The maquette was also useful in making a sales pitch for an elaborate project to a pope or cardinal or to any rich patron.)
Rodin's maquette of a general as a model for a full-size bronze sculpture.

In animation, by the time of Snow White in the mid 1930's, the Disney studio was creating  and distributing to animators scale models of their characters for reference, a practice that was continued until the advent of CGI modeling.
Legendary animator Bill Tytla confronts a maquette of the demon Chernabog
from Fantasia. Photo copyright Walt Disney.
The digital model for animation didn't only make the creation of physical maquettes obsolete for their all-CGI productions; it also eliminated their original purpose in animation, which was to go beyond the paper model sheet in offering to the animators a reference for drawing the characters at any imaginable angle. Henceforth, once the character model was finalized in three dimensions in the computer, no one ever had to worry about drawing the character again, or about staying "on model". The character had only to be manipulated like a flexible puppet, and there was no longer any danger of it looking "wrong".

Meanwhile, I, with other die-hards including some of you readers, remain out here in 2D world, wanting anachronistically to still do it with a pencil or a stylus. In our world, the maquette continues to be of real use.

One can get into trouble drawing rigid objects that must turn and twist in front of the camera without looking like they are changing their shape or their relationship to other features. An accurate maquette can make all the difference in creating convincing animation of spatially challenging structures like noses, hats and chins.  The more complicated the shape, the harder it is to render effectively. 
Just now I have a character design which is giving me some problems when I try to draw him from certain angles. Here is a selection of drawings of the character, Kevin.

Drawings of Kevin from storyboard panels.

Kevin is an obnoxious character.  I want him to be amusing but not sympathetic, so I have deliberately made him weird looking, even a bit ugly. His large keel of a nose gives him a birdlike aspect, and his eyes, instead of being above the nose, are down along either side. This creates a design problem: certain angles of his face need to be avoided because his nose can completely hide the eye on the nose's far side.

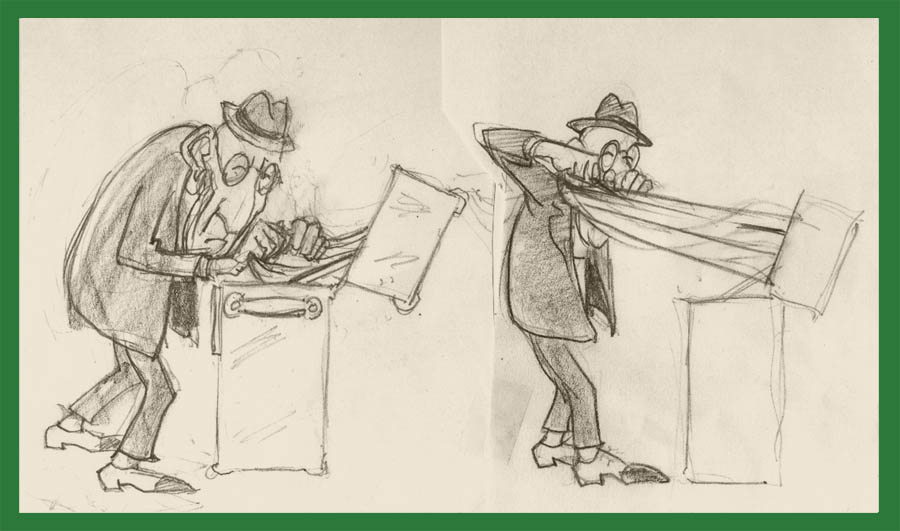
You can see here that the Old Man has an equally large nose, but for two reasons it is not a problem.
With the eyes placed above the large part of the nose, you can still see them no matter which way his head is turned.  Also, this character, an elderly gentleman, is far more restrained in his movement than Kevin, who turns and tosses his head about every which way as he speaks.

The difficulty of drawing Kevin will definitely be alleviated by a maquette of some kind. In the past I have made little maquettes from various materials, including paper.
A folded paper maquette of the Old Man's trunk for my film Carry On.

In the case of character maquettes, I use Sculpey, a modeling material that can be hardened at temperatures within the range of a home oven.  However, if I am only wanting a temporary model to use while I draw, or to help me with drawing a model sheet, I sometimes do not bother to bake it.  The Sculpey material remains pliable for years.
A simple Sculpey maquette of one of my characters, in this case
just showing the major masses of the face and head.
In preparation for doing my Sculpey maquette, I have made some careful drawings of Kevin's head--front, side and 3/4 views. (The 3/4 view actually favors the front view, since it reveals the offside eye better than a drawing that is precisely halfway between front and side.)

Side view
3/4 view
Front view

A CGI Challenge


At some point, it occurred to me that these drawings are exactly what I would create for a CGI modeler to use, and I thought: Maybe there is someone out there who would like to model Kevin in Maya or some other application!

Although I have some experience and understanding in Maya, I have never achieved any real facility in the program, and so this is not something I could easily do myself.

So, I am putting it out there as a challenge. If you model Kevin's head and give me the results, I cannot pay you. But if I can use the images, I will certainly give you a screen credit on my film Carry On, and I will give you publicity in this blog for your achievement.  If you are interested, please contact me directly at bradrick@olypen.com, and I will provide you with additional tips and information. If I get more than one response, I will be happy to publish images from every modeler who takes this on.

Meanwhile I will start on my own physical maquette using Sculpey over a wire armature.

Let the fun begin!


Thursday, December 8, 2016

No. 115, The Face in the Animator's Mirror

This week I decided to discard a whole sequence of my film. It is a sequence that I had meticulously storyboarded, and that I liked a lot. I have even featured it in some posts for this blog (Nos. 111, 112, 113), and I had looked forward with pleasant anticipation to animating it.  But I have thrown it out now because I rewrote another sequence that came out longer than before, and I had to cut something.  The total footage for the film is above six minutes, and if there is one thing I have finally learned,  it is to keep the footage under control. If I don't, the whole film is in danger of never being finished at all. (Why have you never heard of me as an independent film maker before? Because I never finished anything, because all my projects became more ambitious than I could manage, and so they never got done.)

Thinking of all the sequences in Carry On, I saw that there was only one that could be let go.  There was only one that, though it would be fun and entertaining, really added little to the development of the plotline. It's elimination would not ruin or make incomprehensible the rest of the story. It was the scene in the men's toilet where he opens his trunk to get out his huge overcoat. Though I am sorry to see it go, the move keeps me on track to finish the film.

While I try to recover from this painful but sensible event, here is a lighthearted post about something amusing that has followed me all of my life as an animator and cartoonist.

Selfies


Long before the word selfie came into the vocabulary, there have been self-portraits by artists. Rembrandt and Frida Kahlo are just two examples of painters who rendered their own image multiple times.
A Google web search produced this amazing array of Rembrandt self-portraits.

But perhaps no class of artist works with mirrors more than do animators.  We are always mugging at our mirrors, making mouth shapes, contorting our features into simulations of horror, grief, or whatever emotion we are trying to get at in our drawings.  But not just faces.  Also body language involving head tilts, shoulders, and hands and arms are scrutinized in our mirrors.

MGM animator Irv Spence working on a facial expression for Tom.
I have been doing this for all of my life in animation, and even before.  Included in this practice have been a good many images that were actual self-portraits or self-caricatures, of which I have saved quite a lot. Sometimes they were drawn for promotional purposes, as for example to illustrate posts in this blog (the latest of those can be found in post no. 110).  Sometimes they were done for personal friends or party invitations.  Others, just for the hell of it.

Following is a gallery of some of those hand-drawn selfies from over the years.

This is the oldest one I have.  I was about twelve, and the cartooning
style I was emulating here was probably that of Don Martin of Mad Magazine.
Here is one from about 1973. At the time I was trying to be a novelist, and
as you can see, I was still a smoker.
This is a hand-painted animation cel from a self-promotional piece
that was never finished. Note the anatomically precise yet
four-fingered hand. Done circa 1980.


Preliminary sketch for another self-promotional illustration, obviously a precursor
of the painting on the masthead of this blog: the backlight shining
up through the drawing disc illuminates the face. Also about 1980.
On the occasion of getting my first computer games animation job, 1992. Now with contact lenses and moustache.
A few years later.
And later still, I give up contact lenses and go back to eyeglasses.

Detail of an invitation to a party from 2004.
Within the hundred-plus postings to this blog, there must be ten or twelve more examples that cover the period from 2011 until now.  There will be more, I am sure.

All this is just a sort of side-effect of the animator's mirror that is always in my line of vision when I sit down to work.  But it is fun to have a record going back decades of my own perceptions of what I look like.

And while we animators did not invent the selfie, we sometimes cannot resist to capture our own images, again and again through the years.


Monday, November 21, 2016

No. 114, The Character on the Cutting Room Floor

A frame of sequence 7 in Storyboard Pro.
Having now created animatics of four of the sequences for my film Carry On, I am getting some idea of the length of the entire production. Right now, the screen time is something like 6.5 minutes.

For an independent production coming out of a one-man shop, this is an alarming amount of footage. It is not impossible, but with two more sequences still to be storyboarded, it could become overwhelming.  So I am naturally looking for ways to trim unnecessary shots and otherwise tighten up the production.

Every scene is being scrutinized.  What does it add to the telling of the story? What would be the effect of leaving it out? If important, could it be cleverly combined with something else so that the result would be shorter?

Sequence 7 is a case in point. At one minute and twenty-two seconds, it is actually paced rather nicely. But as I began work on the next sequence, number 8, I began to see a problem with them both. The two airline employee characters from 7 appear again in 8, and the interaction between them becomes complicated and time-consuming.  At last I saw that if I rewrote their whole interaction, I could reduce their screen time considerably, while still putting across the same necessary points about their relationship that are essential to the plot. And somehow it seemed now to work better that the senior airline agent should be a man rather than a woman.

It looks as if sequence 7 will now end at about the same length as before, but sequence 8 will be shorter than it would have been, so that the story will become more concise as desired. In addition, the exposition is more clear, and the production benefits all around.

As for the character of the woman airline agent, she is out.  She is, as film makers used to say, on the cutting room floor, like a length of 35mm footage containing her entire screen time, discarded by a film editor.  But of course in animation, editing is virtually always done now, in storyboarding, and not after the film is shot.

Here is what she looks like, together with an image of her replacement:

A promising character design, I will keep her under contract until the right role comes along.
The new guy.


Sunday, November 13, 2016

No. 113, Take Two

After my post about extra drawings in the storyboard (No. 111, When the Storyboard Artist Is Also the Animator) I found myself continuing to work in real time with those drawings, and I decided I wasn't entirely happy with them.  Sometimes you have to tell yourself to let something go so you can get on to the end, but in storyboarding, if it isn't right, it must be fixed. If a pose or a gesture or a camera angle isn't right, you may not be telling the story in the clearest way; you may not be connecting with the viewer.  To ignore the opportunity to improve things in storyboarding is foolish, because this is the last stage when changes can me made cheaply; as experienced animation film makers know, changes in the animation stage or after can be disastrously expensive.

During storyboarding, you actually have the luxury of what a live action director would just call a second or third take.  You can say to your character, in effect, "Let me see you do that again, and this time get it more this way or that way." You thus direct the character: you draw it over and see if you can make it better.

Of course, this extends my metaphor that the independent animator is the director, and the animator, and the storyboard artist, and the inbetweener, and just about every other role in production.  In this case, you are the director talking to the actor (you again) about the character (you yet again.)

The example I will show you here is at the climax of a whole sequence, when the Old Man reveals the overcoat that he has pulled out of his trunk. Here is the first "take" of that shot, in two storyboard panels.

Having failed to tug the garment out with just one hand, the Old Man gets a good
two-handed grip (image 1) and pulls hard (image 2).
I found these poses to be wimpy and not sufficiently dramatic. So I spoke quietly with the Old Man (in my head) and then I had him do a second "take."

Now as he gets his grip, the Old Man is a more interesting silhouette, and he is
coiled like a spring (image 1). This time when he pulls hard (image 2), his torso twists,
the violent motion throws him out of balance, and he will clearly have to take
a step or two backward if he is not to fall down.
Importantly for the animation, there is now more change between the first and second poses.

I want to note that it is interesting to work with a character like this who has some physical limitations and therefore cannot perform all the vigorous variety of moves of a younger character who is in good shape; his back must always be bent, and any violent movement may cause him to lose his balance or even hurt himself. Mostly, though still strong, he must move slowly and with caution.

I have gotten very fond of this old gentleman, and I look forward to doing him justice when I get into the animation.


Saturday, October 22, 2016

No. 112, Richard Williams Teaches Me How to Draw Urinals

On my storyboard, I find myself still in the men's room--in the toilet.  And faced with the challenge of drawing a long neat row of urinals in perspective, I soon turned to the renowned animator and designer Richard Williams.

It was not the urinal itself that was the problem, but the convincing rendering of a series of evenly spaced modules diminishing in the distance.  It is easy to know the size at any point along the row by the perspective lines radiating from the vanishing point, but it is not so easy to know where they should be placed along those lines.

In a lot of things, the experienced artist can fake perspective without going to the trouble of establishing an actual vanishing point and then drawing guidelines. Or perhaps a phrase more accurate than the word fake would be "make an educated guess." If the situation is simple enough, one can often get away with it.

But with things as regular as fenceposts or Doric columns, the viewer will be quick to notice if something is wrong in the spacing.  After only a little drawing and a lot of erasing, I remembered that Richard Williams had addressed this issue in his book The Animator's Survival Kit. It was certainly worth looking up.

This is actually about spacing the drawings of something moving toward you in perspective,
but it also applies to a series of evenly spaced objects in perspective.
A most useful trick to know!
So here is how I applied it to my row of nine urinals.
You can see some of my blue pencil intersections.
What this doesn't give you is any cumulative change in angle as you go down the line. That part, I did fake.

And now here are the urinals again, this time with customers.


And all of this for a shot that will be on screen for less than two seconds. My thanks to Richard Williams, and to the great Warner's animator Ken Harris, who showed him this trick.

Saturday, October 15, 2016

No. 111, When the Storyboard Artist Is Also the Animator...

When the storyboard artist happens also to be the animator, some things may be included in the storyboard that would not otherwise be.


In my case, as an independent film maker, I am just about everything else in the production pipeline, too--but never mind about that.

 When I am the Storyboard Person and I come to a scene where my thinking is engaged in the development of a scene, sometimes the Animator takes the pencil away from me and adds some "unnecessary" panels to the board.

Of course they are not entirely unnecessary--not at all.  But they are perhaps not necessary to the storyboard as such; they are instead necessary as thumbnails for the animator. Thumbnailing your animation ideas is considered an essential step for the animator in visualizing all the action of a scene before more detailed work is begun.

I do consider not including these more subtle stages of movement, but when I do, the Animator jumps to his feet in great agitation, saying, "Wait! Having thought of these details, how can you not set them down?  What if, by the time I, the Animator, at last get hold of the scene, I do not recall these inspirations that have occurred to us, and instead do something with the movement of this character that is less interesting than what we have thought of here? Then, having not recorded these fleetiing but wonderful notions, they will be lost."

And so I find that I, the Storyboard Person (Storyboardist? Why is there not a one-word term for this art? Even Inbetweener, awkward though it is, is but a single word) cannot argue with the Animator in this. If you think it, if you like it, write it down or draw it; make a note of it.  Because, you see, if you think of it and do not record it, and then you forget the thought that you had, you may even forget that you had any idea at all.  You will not even know that anything is missing. Why take that chance?

Following is a part of a scene that might have been depicted satisfactorily in just five panels, storyboard-wise. But for the sake of the Animator, I (the Storyboard Person) have included some extra stages of movement.

The first panel, the first pose.

He pushes open the lid; an essential panel.
Reaching into the lid; another essential panel.
In this panel and the next, the man unsuccessfully tries to pull something out
of the lid, This might be something that the animator and not the storyboard
person would be adding.
The Old Man now takes a two-handed grip.
This drawing clearly could be omitted from the storyboard, if not from the
notes of the animator.
This panel is another essential, showing the flow of the big overcoat as it
emerges from the lid of the trunk.
Another panel not essential to the storyboard. One can easily get the whole
idea of the action without these two sepia-colored panels.
The final essential panel.
Yes, we could easily have met the requirements of the storyboard with only seven of these nine images, and perhaps with only five.  And yet, having visualized the action, why not note it down? In my opinion, storyboard artists should always err on the side of excess rather than omitting that which might prove to be useful and evocative.

Tuesday, October 11, 2016

No. 110, Welcome Recognition

In the Top 100


Today I was pleased to be notified by Anuj Agarwal, founder of Feedspot, that this blog has made their newly revised list of Top 100 Animation Blogs. (See the badge displayed at the top of my sidebar.)


This means a lot to me, as I am one whose target audience is restricted somewhat to people interested in pursuing 2D animation--admittedly, a small group even world-wide--as opposed to that of someone writing about animation news or animation in general.  Also, with some exceptions such as book reviews, I restrict the content to accounts of my own personal experiences in animation.

Nevertheless, I expect that there will be many new people looking in on this blog now, so I am determined to keep posting tips and personal accounts that are as interesting as I can make them. Therefore,  both to the loyal followers I already have and to anyone new, please keep coming back for more.

Wednesday, September 28, 2016

No. 109, Fun in the Men's Room

In my film Carry On, now in production at the storyboard and animatic stage, the main character, an Old Man trying to get a large trunk aboard an airliner as carry-on luggage, has to make a wardrobe change. Dragging the trunk into one of the public men's rooms at the airport, he proceeds to open the trunk to get at his clothing.

As I thought about the situation, I realized there was a possibility here for some comic business in the background.

The Old Man, intent on what he is doing, is oblivious of all else around him, but unwittingly he is disturbing the other men in the large restroom.

I knew right away I didn't want to do any gags about farting or anything else scatological, but I did see that I could make something out of the vague discomfort and wariness that many men feel when in a public restroom.

Following are a few drawings showing the development of this short scene. Some of them may not make the final cut, but they illustrate the storyboard artist's exploration of potential comic elements.

First shot.
We see the big trunk being dragged into the men's room. No need to
animate the Old Man here!

Next, a shot of a men's room user, vacantly staring at the wall.  It is
obvious what he is doing.
Go to close up.
Unusual noises wake him up. (The viewer has already heard
these same noises before: it is the Old Man opening the buckles
and catches of his big suitcase.)
He tries to see without turning his head, but...
...in the end he must turn his head.
Wide shot of the room. The Old Man is about to open his case.
Another man gets curious.
With a flourish, the Old Man whips out a heavy overcoat from the open case, startling a man about to leave the restroom.

Some of these images are not final storyboard panels, but I am well on my way to locking this section of storyboard down into precise camera shots and angles.

I'm having fun in the men's room.  How about you?