Pages

For People Crazy About 2D Animation!

Acme Punched! is for people crazy about 2D animation. It may be enjoyed by beginners and others, but it is aimed at animators who know already something about the process of animation and the basics of character animation. In large part, it will attempt to provide a deep look into the problem solving that goes on in my head as I work out a scene, often in step-by-step posts that I will sometimes enter in "real time", without knowing in advance what the outcome will be. Mistakes and false starts will not only be included but emphasized, so that the creative process of animation will be portrayed realistically. And, while my own bias is for 2D drawn animation, many of the effects and principles discussed here can apply to CGI 3D animation as well. I hope the blog will prove useful and instructive for all.

-Jim Bradrick

Wednesday, April 23, 2014

No. 62, A Walk Cycle for Albert, Part Five: Side View

 Solution to "Mystery Change"


In the last post (No. 61), I challenged you to find a difference in timing between the two versions of the walk cycle.  No one took me up on it, and I admit it was a subtle detail to find amid everything else that was going on in the cycle.  But the answer is: I changed the timing of the right arm (the one holding the bag).  In version 1, as the bag comes forward and then reverses direction to recede again, the movement seemed to me to have a stabbing aspect to it; that is, it took no time and no effort to reverse direction.  I thought this was inappropriate for a bag that might weigh 100 pounds or 45 kilograms.

I therefore took a look at the spacing of the drawings.  As the bag comes forward, it has an appropriate cushion-in.  The chart below shows the relative positions of the seam at the front of the bag.


But as the bag reverses direction, the drawings were not spaced so as to give a good impression of the cushion-out (the spacing that indicates that an object starts out slowly and accelerates.)  The next chart shows both the old and the improved spacings.  Again, it is the seam on the bag that we are following.
The original spacing is shown in red, on the left.  Final spacing on the right.
I think if you will now go back to post no. 61 and carefully compare the two versions, you will observe more of a slow-down and hesitation between the forward and backward movements of the bag.  It is more like the compression and release of a spring, as it should be, rather than like something bouncing.


Translating to the Side View

The obvious way to begin this translation of view is to construct the first image over the corresponding one of the other.  On my drawing board, that looks like this:
The front view showing through on my backlighted animation disk.
In a case like this, which is just a rotation on the Y axis, as the 3D-ers would think of it, many measurements can be directly applied from one drawing to the other.

Here are the two images separated, with a few points of congruence highlighted:
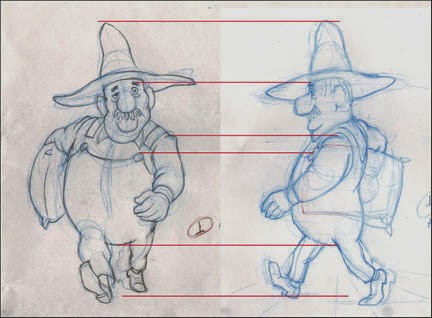
Showing where the top of the hat, the eyebrow, the shoulder seam, the top of the button and the bottom of the body mass coincide in both drawings.
Some things, of course, require adjustment.  Mainly these are the parts that project forward or backward in imagined space from the plane of the torso.  Thus the left hand appears larger in the front view to create the illusion that it is closer to the viewer, and the left foot is drawn smaller to show that it is farther back.

It should be emphasized that a walk cycle--or any animation, for that matter--should be designed with the perspective of its layout or background in mind; note the converging lines like floorboards on the drawing at right above, indicating the plane upon which the character is walking.  If you animate something without regard for the perspective and scale of the layout, you may be wasting time and work.  This should be considered even if creating something such as a gif animation meant to occupy the featureless expanse of a webpage.

Creating other angles wherein the viewpoint is raised or lowered is also possible, but here more sophisticated drawing skills are required to extrapolate from one to the other.
The same pose from a high angle, 3/4-front view.
I once was called upon to animate a character running while the camera swooped all about him--something a 3D animator of today would, admittedly, be able to do easily.  Yet once I had done a version of his run cycle from one viewpoint, I was able to work out all the other angles, and the whole thing worked very well.

Here is the first pencil test of the side view walk cycle:
I thought it worked pretty well, and it was fun to watch, yet something was not quite right for the walk of a man traveling a great distance.  Finally I decided that his stride was a bit too long; he is reaching a bit too far with each step.

So I shortened his stride by this much:
The erased images in red brackets show the original reach of his stride.
Here is the second test, incorporating the somewhat shorter stride along with a few other adjustments to the foot and leg positions in all the drawings:

I like this second version; except for details and cleanup, I am calling it done.

Your comments and questions are always welcome, and if you like what I am doing here, why not click on the Join This Site button and become a Follower?  That way you won't miss any posts, and I promise you many more to come!


Coming soon: Walks for Albert's Companions, a Fox and a Goose--two short-legged characters who must keep up with Albert's rapid pace!

Thursday, April 10, 2014

No. 61, A Walk Cycle for Albert, Part Four: Front View Final

I am going to present two versions of Albert's walk made this past week.  The first is about half cleaned up, with not all of my planned changes yet done.  The second is the final cleanup.  Later in this post, I will explain why I am including the half-finished version as well as the final.
The half-finished version. Here, some of the drawings are still in blue pencil but most of the planned changes are in.

This is the final pencil test; the drawings are all done in graphite pencil now and are ready to be scanned for digital ink-and-paint.

Cheap Trick Department:
When doing cycles such as this, one is constantly comparing the first half of the cycle with the other half; otherwise, the movement will not look balanced. In this case, drawing 1 (the right foot contact drawing) is more-or-less a mirror image of drawing 15 (the left foot contact drawing.)  Thus, each drawing in the cycle has its mirror counterpart.  With 14 drawings to track in this way, I have found it useful to give the drawings an alphabetic designation as well as its numeric one.  So drawings 1 and 15 are both also "A"; drawings 3 and 17 are both "B", and so on.  In this way it is easy to pull out both the drawings marked C or D or whatever for comparision to one another.

Changes made since the version shown in Post No. 60:
--More change of scale front to back.  That is, when Albert's foot or hand is closer to the camera, it is more obviously larger than when it is at the back, farthest from the camera.  This change of scale in what 3D animators call the Z axis can add depth and drama to a scene, even when the character's body remains a constant distance from the camera.  Opportunities to utilize this enhancement should not be neglected.

--Left arm animation.  As mentioned in No. 60, I was unhappy with the arc of the arm as it came forward.  This has been fixed.

--Shorter pants legs, with socks showing.  Shown only in the final.  Albert's socks are red, so there will be an amusing flash of color there.  Also I am simply complying with my own model sheets for Albert, bringing him on model.  The pants legs also are animated as a follow-through to the leg movement but this is rather subtle.

--Precise drawing.  Cleaning up the images in the same order in which they were drawn as roughs (extremes, then breakdowns, then inbetweens), everything has been tightened up.

--Foot slippage.  This could come under the heading of precise drawing, above, but in walk or run cycles it rates its own category.
Foot Slippage chart on drawing 17.
In doing the rough animation, I had just "eyeballed" the foot positions, but when it came time to clean the drawings up, I scrutinized them closely and found it useful to make this chart.  The lines represent the back of the heel on drawings where they are in contact with the ground.  Note the ghost images showing where the feet originally were in this drawing.

--Mystery Change ???  There is one other change I made here, and I challenge you to find it by comparing the Half-Finished and Final pencil tests above.  No new drawings were added, but something I haven't mentioned has been re-timed.

Can you find it?  I will post the answer next time, but I would like to hear from anyone who can find the change.  Moreover, can anyone tell me why I made this change?


Next: We Rotate Albert 90 Degrees and See His Walk from the Side.

Wednesday, April 2, 2014

No. 60, A Walk Cycle for Albert, Part Three: The Full Test

In addition to filling in all drawings for this walk cycle, this week I have improved the readability of these pencil tests.  Because I often do my rough drawings in blue pencil, the tests done in Toki Line Test software have been of such a low contrast that by the time they have been rendered as Quicktime Movies, they are hard to see, especially if there are multiple levels.  Now I have greatly improved this by exporting the drawings from Toki as jpegs, then adjusting their values in Photoshop before importing them once again into Toki Line Test.  I think you will appreciate the sharper, more high contrast result.

This test is now working in most ways.  A good walk cycle includes many details of movement besides just moving the feet and legs and swinging the arms. Here are some things I included in Albert's walk:

Rhythmic vertical movement. Does the character rise up or drop down on the passing positions, and by how much?  I have Albert rising up enough to be noticeable.

Shoulder action.  Albert's upper torso rotates in opposition to his hips, but his right shoulder is kept highest at all times because of the load he is carrying on that side.

The legs and feet.  They are working well.  Just before each of the contact drawings I inserted a little kick; he throws his foot out past the point of contact for one drawing (2 frames) which adds a nice confident snap to his walk.  It has an impact more felt than seen. Here is the detail showing that:

Two drawings before contact.
One drawing before contact; the foot is thrown forward, beyond the contact point.  


The contact drawing (his right foot.)
Head action.  I have made his head tilt to alternate sides on the contact drawings and to be verticle--untilted--on the passing positions. This will mean that in a side view of the same action, his face will be partially hidden by his hat brim when the right foot makes contact (see drawing above) but I have planned for that.

The swinging arm.  This works pretty well but I don't like the way the arm comes forward.  It should swing out farther rather than in as I have it now.

Follow through actions.  [1] After the contact drawings, the belly descends and delays coming up for a couple of drawings, giving him an appropriate heaviness.  I want to refine this some more.  [2] When the left hand reaches its full extent at the front it flips up.  [3] The hatbrim flips up and down a little as he bounces along, but that needs more refinement also.

These details and others can be thought about and added in now that the basic elements of the walk are in and approved.  Although it is possible to suggest secondary and follow-through action during the first pass through the animation, usually they will need some adjustment, and it is perfectly alright not to put them in at all until the first pass is complete.  A walk cycle like this presents a lot of challenges, so it is all-important to get the basics right first.

For an exhaustive look at animating walks, see Richard Williams' book The Animator's Survival Kit.


Next: Refining the Details of the Walk