Pages

For People Crazy About 2D Animation!

Acme Punched! is for people crazy about 2D animation. It may be enjoyed by beginners and others, but it is aimed at animators who know already something about the process of animation and the basics of character animation. In large part, it will attempt to provide a deep look into the problem solving that goes on in my head as I work out a scene, often in step-by-step posts that I will sometimes enter in "real time", without knowing in advance what the outcome will be. Mistakes and false starts will not only be included but emphasized, so that the creative process of animation will be portrayed realistically. And, while my own bias is for 2D drawn animation, many of the effects and principles discussed here can apply to CGI 3D animation as well. I hope the blog will prove useful and instructive for all.

-Jim Bradrick

Thursday, September 11, 2014

No. 74, Rare Animation Books: The Animated Film

The Animated Film, by Roger Manvell, pub. 1954 by Sylvan Press. 63 pages.


This book, subtitled "with pictures from the film 'Animal Farm' by Halas and Barchelor", was remarkable in its day for not being about the Walt Disney studio.  Indeed, it was about a British studio and their production of the first British feature-length animated film.  Across the pond at Disney, work was going forth on Lady and the Tramp, another sentimental adventure with songs that had become a Disney mainstay.  Animal Farm was nothing of the sort.

The film was based on a popular book of the same name by George Orwell, who was a journalist and, later on, author of the  more famous dystopian novel 1984. The book was a satire of the communist form of government and, more specifically, of the Soviet version of communism, which in its heavy handed way had become in many ways indistinguishable from fascism.  It told the story of farm animals who rise up and overthrow their human master and then attempt to govern themselves, with the more cunning and ruthless among them eventually rising to the top.  "All animals are equal," goes the famous quote, "but some are more equal than others."

Expressive animation of the pig who decided he was "more equal than others."


Two still frames in black and white from the color film Animal Farm.


Today it is known that the CIA, interested in any kind of anti-Soviet propaganda, obtained the film rights to Animal Farm, and that under the direction of Howard Hunt (of Watergate infamy) the producer Louis De Rochement was chosen as front man.  De Rochemont then selected the Halas and Batchelor studio to create the film. It is not generally believed that the studio had knowledge of the source of their funding at the time.

The Halas and Batchelor workflow chart of animation production.


The film was remarkable for being of adult interest rather than that of children.  John Halas, a Hungarian immigrant to England, and his wife and partner, Joy Batchelor, expanded their studio to a staff of 70 for the production. Three years, from 1951 to 1954, were spent in the making of the film. The technique and style chosen were not unlike the Disney model, with drawn animation traced and painted onto cels, and with care taken to achieve a certain amount of realism in the movement and design, again in the mode of Disney.  It was, after all, intended to be released as a commercial product, so it needed to be able to compete.

A page showing development of the design for one of the human characters in the film.

Model sheets of some of the animal characters.


The book includes expressive model sheets of the characters, sections of storyboard, layouts and animation drawings.

A detail of the Tension Chart.


An interesting insert is a foldout "Tension Chart" showing the flow of tension or excitement from beginning to end, including notes on mood, music and color.
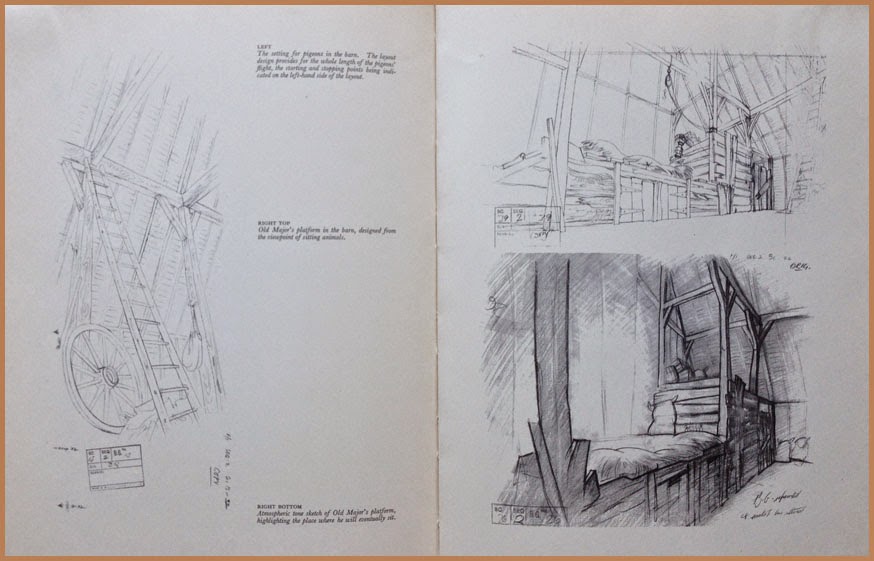
Background layouts.


But although the film was in color, the books illustrations are all in black and white.  Altogether it is a fascinating look through a parallax lens of feature animation production in a country other than the US.

Views of production work around the Halas and Batchelor studios.


Roger Manvell, the author, was a writer who had worked for years with Halas and Batchelor "as a researcher, author and screenwriter", according to the 2006 book Halas and Batchelor Cartoons, An Animated History, by Vivien Halas and others.  In addition to The Animated Film, he also wrote in association with John Halas three other books on animation.

The Animated Film is out of print and likely to be very difficult to obtain.

Wednesday, September 3, 2014

No. 73, Rare Animation Books: The Art of Animation

The Art of Animation, by Bob Thomas, 187 pages. Pub. 1958 by Simon and Schuster.

 This colorful book was conceived around the Disney studio's production of Sleeping Beauty (1959) and showcases its art in particular. And unlike the Robert D. Feild Art of Walt Disney, published in 1940 and reviewed in my post no. 72, it gives due credit to the names and personalities of the many great Disney artists throughout the history of the studio. Surprisingly, there is even a Compilation of Animation Credits section at the end. On the other hand,  it is also like the previous book in that it has the taint of a corporate production, a Disney promotion that makes no mention of any other studio or of anything negative such as the labor union battles of the 1940s or the diminished interest of Walt Disney himself in his animated productions.

A double-page spread using a still from the film of Sleeping Beauty.


The Disney story was presented in an entertaining and beautifully laid out book.  There was plenty of production art to look at, though it was often juxtaposed with non-production art that had the look of Little Golden Books art--flattened, not quite on model.  Even as a boy I recognized and resented this insertion by an art director of what I considered second generation interpretations of the real thing.

Another spread showing stills from three cartoons, two illustrations featuring production art, and at lower right a Golden Books-style illustration.


Nevertheless, there was information here that had never before reached such a wide audience, much of it in archival photographs and their captions.

Shot of a story conference in the old Hyperion studio, mid 1930's.  That's inspiration artist Albert Hurter at extreme right.

First photo and first mention of which I am aware of Disney's Nine Old Men of animation. The term was not used by Walt endearingly.


Pictures of the animators at work intrigued me particularly, as they showed the artists with pencils actually in hand, actualy animating, the stacks of drawings and pinned-up model sheets all around them. To me, already in love with the idea of animating as a career, it was thrilling.

Animator Ollie Johnston at his board, mugging into his mirror while animating a fairy.


Looking back from 2014, with all the wealth of critical writing about Walt that we now have, with all the interviews and research accomplished by animation historians like Jim Korkis and Mike Barrier, the Bob Thomas book seems without depth, but it marked the beginning of a time of greater interest in the people of animation who made Walt Disney look good and in the art of animation itself.

A spread showing the work of background stylist Eyvind Earle, whose angular and geometric designs influenced even the character design in Sleeping Beauty.


My copy is a first edition that I have owned for more than fifty years, as evidenced by its worn appearance.  An internet search through rare booksellers or ebay might turn up a copy for you.

Tuesday, August 26, 2014

No. 72, Rare Animation Books: The Art of Walt Disney, by Feild

The Art of Walt Disney, by Robert D. Feild, 290 pages, pub. 1942 by Macmillan and Co.


First, you should understand that there are  two completely different books called The Art of Walt Disney. The better known of these is the most recent, a massive coffee table book by Christopher Finch first published in 1974.  In fact, when I went to Amazon just now to look at reviews of the earlier Art of Walt Disney, I found that all the reviews seemed to be of the 1974 book; all these people had no knowledge of the one published in the 1940s.  But the Finch version, rich in color artwork but short on real information about the animation studio, was for me a vast disappointment.

The other book known as The Art of Walt Disney was published in 1942 and written by a professor of art who was given a year of access to the Disney studio in Burbank between 1939 and 1940.  An interesting year it was, too, for Snow White and the Seven Dwarfs had premiered successfully in 1937, proving the viability of feature-length animation and spurring the studio to initiate production on not one but several new features.  The book therefore contains details on the production of Pinocchio, Fantasia, Bambi and Dumbo, all of which were in various stages of development, as well as many animated short subjects which were still a major division of production at Disney.

Early concepts of the 7 dwarfs. Some of these are by Albert Hurter.


As an art historian Feild admitted to a quandary about what the animated productions of the Disney studio actually meant as art, but he knew he was onto something big and exciting.  Disney the producer had thrown far more money back into raising the standards of animation than he had kept for himself, and the result was a clear lead in production quality and standards over every other Hollywood studio.  Efforts by other countries, from the Disney point of view, did not even exist.

Layout sketches, possibly by Tyrus Wong.


The book itself was the first serious literary survey of Disney or of any animation, and its publication was a tribute to the new recognition and respect accorded to Walt Disney after his sensational breakout from shorts starring Mickey Mouse, Donald Duck and Goofy into the world of feature films.  For an exhilerating two years or so after the release of Snow White, anything seemed possible and the continued success of the studio seemed assured.

World war beginning in  1939 with Hitler's invasion of Poland ended all that, closing lucrative distribution markets in Europe and, after 1941, diverting much of the studio's energy into jingoist war propaganda.  According to a 1942 review in Saturday Review, however, the book went to press before the December, 1941, bombing of Pearl Harbor, and so Feild's writing was not influenced by the direct involvement of America--and Hollywood--in World War II.

These may be examples of Shamus Culhane's "fast animation" technique.


There is an oft-told story of Walt Disney confronting one of his ambitious young artists back in the '30's, telling him not to get any ideas about making a name for himself at the studio; the only name the public was to see was that of Walt Disney. The story is true, though of course the features from Snow White on had artist credits just like any other feature films.  But Feild in his book maintained Disney's attitude about keeping the artists anonymous, and so there is not a single animator or designer mentioned by name in the entire book. From the point of view of historical interest, this is an unfortunate omission, although subsequent writing over the ensuing decades has illuminated some of this darkness. One can easily recognize the work of Marc Davis, of Milt Kahl, of Rico LeBrun and others.

Some of Preston Blair's dancing hippo drawings, made famous in his animation book.


The text  is written in a somewhat verbose style typical of the day, but the book does a good job of detailing the Disney production process and even makes an attempt to describe the intricacies of animating. Much is made of the expansive new Burbank production plant. Yet the refusal to name names continues to be an irritant throughout.  Besides Walt, only Roy Disney is mentioned by name.  How can you tell the story of Walt Disney without mention of Ub Iwerks?  Of Ham Luske and Norm Ferguson and Bill Tytla and Freddie Moore?  Yet Feild manages to keep them all behind the curtain, to the point that I suspect this anonymity was a precondition imposed on him by Walt.

Uncredited like all the others, here are some structural guides for deer animation by Rico LeBrun.


Nevertheless there are many full-page plates or illustrations, some in color, that make the book a worthwhile document of the Disney studio in the early 1940s.

Animation drawings of Ali the alligator, very possibly by John Lounsberry.


Feild's The Art of Walt Disney is considered a collector's item.  My copy is a British reprint (1944) published in London by Collins.  Copies available on the internet are few and  not inexpensive, but it is still possible to get one if you want it badly enough.


Sunday, August 3, 2014

No. 71, Me vs Toon Boom StoryBoard Pro, Part Three


The Moving Storyboard


Now we get to the point where StoryBoard Pro is not just a storyboard platform but also a tool for creating an animatic. Like the storyboard itself, the animatic is a planning tool for discovering the best way to tell a story and for discovering problems before all the expense of creating animation and full production art.  Where a live-action film maker might shoot footage at a ratio of ten feet for every foot used in the final edit, the goal of the animation studio with its highly expensive and labor intensive production cost, was a ratio of one to one.  The storyboard and especially the animatic could make that happen.

Originally called a Leica reel, the animatic is a filmed (or videoed) storyboard, with the duration of each panel timed to play as nearly as possible to the calculated length of the same action in the final animation.  Thus an accurate animatic lasting ten minutes and twenty-two seconds onscreen will represent the final production lasting the same amount of time.

One thing that SBP can do is help the animator to accurately time transitions and certain types of movement upon the screen.  Here is my first example from the developing storyboard for my new film The Two Washingtons.


This is the establishing shot for the whole film.  Looking through the grid of a window, we see a huge jet taking off.  An appropriate sound effect will be added.  Then we dissolve to the interior of the airline terminal building, immediately pulling away from the window and widening out to reveal the large gate area crowded with people waiting for their flight to be called.  The background sound will change to the ambience of an airport building, with murmurring voices, footfalls, and the occasional PA announcement.

To accomplish this little sequence I used three of SBP's effects: 1) an animated layer (the airplane), 2) the cross-dissolve from the airplane shot to the interior shot, and 3) a long camera truck-out from the window to a wide shot of the whole room.

Let's think about it piece-by-piece.  The airplane shot might have taken from two to four frames of a conventional storyboard.  Limited to that, I think I would have done it like this:

How this shot might look in a conventional storyboard.


But SBP allows me to do it with just two drawings, the airplane and the window grid, and the result is about as good as I could hope to make it in the final film!

The Animated Layer


The animated layer is about as simple to do as can be.  You select your panel, then the layer you want to animate.  (Of course you will have to have planned this as you constructed your storyboard, so that anything moving will be on its own layer.  If you think something in a scene might move, or of course if the background is to be used in more than one panel, then you should be thinking and working in separate layers.) Next, you use the First Frame Transform tool and manipulate the image to its beginning position.  All the basic transform functions are available, so you can not only reposition but scale, skew, rotate, and so on.  In the case of the airliner, I slid it down out of the camera frame at lower left and also scaled it proportionally down.

The green rectangle is the camera field.


Then I clicked Last Frame Transform and pushed the airplane image off the screen at upper right.  Done!  The plane appears to be taking off outside the window, growing larger as it rises.


This is not actually the last frame position, because that happens near the end of the cross dissolve and is therefore nearly transparent, but it is near the end.


Camera Move

The second panel is done not as a layer move but as a camera move.  With the chosen panel selected, click on the Camera symbol in the toolbar, then open Tool Properties.

Tool Properties panel for Camera
As I am still learning this program, I do not yet fully understand the sections of this panel called Selected Keyframes and Static Attributes.  Here we will be concerned only with the top section, Camera Transform.

From left to right, the first three symbols are: 1) Set Keyframe at Beginning of Panel, 2) Set Keyframe at Current Frame of Panel, and 3) Set Keyframe at Last Frame of Panel. In my shot of the airport interior, I have used just 1 and 3, because the camera is to move throughout the shot. It is important to set both these keyframes, first and last, before moving your camera.  When you do this, the camera fields start out the same for both frames, so they are superimposed.  But at the bottom of the field, there is a green square for the first frame and a red square for the last.  Click and drag on each of these squares to adjust your opening and ending positions.  Here is what mine looked like after making those moves.

The panel in Camera View, clearly showing the move from start (green) to finish (red).


Note: a change in rotation is also possible here, as for example I could have rotated the green window so that the horizontal window bars started out parallel with the match shot in the previous panel.  I decided this was unnecessary however.

I am not quite finished here.  Rather than have the camera move at a constant rate, I decided to add ease in and ease out on both ends, but at different rates.  To do that, go to the Ease In, Ease Out lines in the Camera Transform box and just enter values for the durations of those eases.  In this case I chose 10 frames for the ease in (less than half a second at 24fps) and a full two seconds for the ease out.  These are easy to keep adjusting until they feel right.


The Transition

The last thing I have to do in this little two-panel scene is to add a smooth transition between panels. Find the New Transition icon in the toolbar and click on that.  I want to do a simple cross dissolve, which is the default option. There are also some wipe options.  Select the transition you want by double-clicking on the transition symbol on the timeline, or use the panel view.  The duration of the transition can be changed by pulling the edges of the transition symbol to left or right in the timeline.

Again, I applaud the ease of use of these functions.  I figured all this out and set it up in far less time than it took to write about it.


Next time I will show you another example of camera work in SBP, and I will also talk about some drawing options that are not available in Animate or Animate Pro.

Monday, July 14, 2014

No. 70, Me vs Toon Boom StoryBoard Pro, Part Two

The Hybrid Approach

 I still like drawing on paper.  Are you surprised?

Last time I featured mostly images that were drawn directly into StoryBoard Pro with a stylus and my Wacom tablet.  As I continued my exploration of SBP, I found that some complex setups were, for me, better done by working on paper, then importing the image into the program.  Could I have done them paperless?  Yes, but I think it would have taken me a longer time, and storyboarding is often required to be done quickly and efficiently.

Each user should make her or his own decision about this.  Yeah, I am an older guy with a long history of composing my work on paper, so that is my inclination.  If you grew up with computers, it will likely be easier for you to go all digital, and your results may be just as good that way.  I have plenty of respect for the all-digital artist.

However, Toon Boom has not neglected us paper-bound animators.  They have always accommodated import and scanning of hand-drawn and bitmap images of all kinds, including color images.

Smart Use of Your Smart Phone

My own procedure with animation drawings has been to scan them in with a Mustek scanner, with the Acme punched (there's that term again!) paper registered to a taped-down acme peg bar attached to the frame of the scanner, outside the scanning field.  For storyboard images, I could do something similar, but I have realized there is an even easier way.

A smartphone plus drawings equals easy import of rough pencil drawings.


Laying the drawings out flat on my desk, I just stand up and shoot photos of them individually with my iPhone.  Then I connect the iPhone to my laptop, open iPhoto, import the images, and copy them from iPhoto into a folder.  They come in as jpegs, and from there I can import them directly into SBP.

The raw smartphone image.


However, I do sometimes add one more step, which is to first bring them into Photoshop, crop them to get just the part of the image I want, and manipulate the brightness and contrast.  It is faster than using the scanner, and you can do it in a coffee shop or anywhere, with only your laptop or tablet plus your smart phone.

The same image brightened and cropped in Photoshop.


I would not use this method for any precision image such as a background layout because there can be slight distortions in perspective and proportions, but in the rough and sketchy world of storyboards, the results are perfectly acceptable.  You can still use that image as a rough layer, re-drawing the appropriate parts of the image onto separate layers using the SBP drawing tools.  This is what I refer to as the hybrid approach--combining imported rough pencil sketches, with final drawings made using SBP's drawing tools on layers above.

Try it!

The imported image partially inked with SBP drawing tools.


Exporting the Storyboard to PDF


I had a question from a reader this week about exporting from SBP to PDF; specifically, how to do it so that the Dialog  and other written notes would export and appear with the panels in the PDF.  Exporting to a printable format is of course often a desirable way to share a storyboard, making it possible for individuals to make notes and suggestions on paper that may then be considered as revisions.

I did some experimenting and found that this will work only if you choose certain options under PDF Export Parameters in the Export to PDF window.

The Export to PDF window, with 3 Panels Vertical selected.


My findings are that the first four options--3 Panels Horizontal, 3 Panels Vertical, Full Page (one panel) and Overview 2x4 Panels--all will include any notes or dialog in the PDF.  The others--Overview 4x3, Overview 8x10 and the Japanese formats--apparently will not.  These formats include so many panels per page that there is no room for the notes.

Caution:   In the formats that will include notes, if your notes run especially long, they will still be included, but at the expense of bumping one or more panels onto the next page.


Next:  Storyboards That Move!


Wednesday, July 2, 2014

No. 69, Me vs Toon Boom StoryBoard Pro, Part One

Whenever I take on a new software application, there is of course a period of intense struggle, the learning wall that I must climb before the program can be any fun to work with.  This is inevitable, and I have come to expect it.

In the case of Toon Boom's StoryBoard Pro, the wall was a short one, and I was boosted over by my previous experience with Toon Boom's other applications: first Studio, beginning back in 2006, then Animate and, finally, Animate Pro 2.  This was helpful because of the great similarities in the UI and terminology among the various ToonBoom applications, so that even as I opened the storyboarding program for the first time, much of what I saw in front of me was familiar--the same tools, icons, and organizational structure that I already knew.

Furthermore, Toon Boom's unparalleled tutorial resources which they provide free for all their applications, plus other tutorials both amateur and professional on You Tube, help to answer the many questions that arise when attempting to master StoryBoard Pro or any of their other products. Why all other software companies do not make similar efforts to freely educate the public in the use of their applications, preferring to rely on pay tutorial services, I do not understand.  The more people there are who know how to confidently use your product, the more likely it is that it will be bought and used.  Toon Boom has certainly got the right idea here.

The big attraction for me to StoryBoard Pro was its capability to generate animatics complete with camera maneuvers and soundtracks.

The big challenge for me, I knew, was to learn to comfortably draw directly into the panels with my stylus and Wacom tablet. 

Working With a Script

 Using as my test project the concept I call The Two Washingtons, the same one for which I have recently recounted my character design process [Acme Punched! posts no's 64 and 65], I started by writing a script complete with dialog and camera directions, during the course of which one of the two main characters changed completely in concept and had to be re-designed (see below.)

A change in character often necessitates a change in design.


The script notations included a sequential number for every scene (or camera shot, as it is called in live action.)  My script had 24 scenes, so when I opened StoryBoard Pro for my new project, I laid out 24 scenes and copy-pasted the directions for each scene from the script into the Action Notes box in the Panel View.  (I should note that as I write this, some of the staging for what is now scene 24 is unclear in my mind, and so I expect that when I get to that point in my storyboard, it will end up being divided into several more scenes. But the flexibility of StoryBoard Pro facilitates changes, just as in a paper storyboard, easily allowing additions, rearrangement and deletions, so this does not worry me.)

A section of page 1 of my script.

The script for Scene 1 pasted into the Action Notes window in StoryBoard Pro.


Using a written script may not be the best approach for everyone.  Some may prefer to work from the outset with visual representations of the scenes, but I have some experience in writing fiction and live-action scripts and so it appeals to me as the right way to begin.

Thumbnails

Along the way I was making thumbnails on paper which I kept before me as I worked. These were just quick sketches, only a few inches or centimeters high,  of poses and situations that I was visualizing as I worked through the script, and which I jotted down quickly without regard for character accuracy or precise drawing.  This can be a valuable way to work, and I recommend it.

Early thumbnail sketches.


Bitmap or Vector?

 The StoryBoard  Pro application allows drawing in either bitmap or vector modes, though not both on the same layer.  The default layer choice is vector (I did not find a way to change this), and after some experimentation I found this to be preferable because of the smoothing property, a feature found in many vector drawing apps.  This property may be set at any percentage from 0 to 100 and will help remove shaky or hesitant tremors in any drawn vector line. I like it set at around 20 most of the time, but this will be different for each artist.  Setting the smoothing very high, however, can cause the algorithm to redraw your line without any of its original character, so this should usually be avoided.

Testing three settings of the Smoothness property in vector inking.
Here I inked one rough drawing three times, using no smoothing, 50% smoothing and 100% smoothing, as indicated.  If you look closely, you can see that the 0% setting gave me the most faithful rendering of the rough, yet it contains some nervous lines at the top of the cap.  At the other end of the scale, the 100% setting straightened some curves completely (under the eye and at the mouth) and made very small detail almost impossible to render.  Drawing a round pupil in the eye was not possible, and getting it as good as I did required 4 or 5 repeated strokes.  Even the 50% version was taking too much control of the line to suit me.

Another advantage of vector inking, or course, is that the lines remain crisp at any scale.

Keeping It Rough

 With the idea of ending up with not just a storyboard but an animatic, I found that a good way to work was to go through the entire board in very rough form, using separate layers for whatever elements in the scene will be shown to move or change. 

In the course of roughing out the storyboard, new ideas for movement, transitions or other changes will naturally present themselves. If you are working rough, it will be less painful to create the necessary layers or panels to accommodate these new things than if you were working in a more finished way.

Rough storyboard panel.  The black rectangle is the camera field, which will be adjusted later.
I have roughed in more than half of this storyboard as of this writing.


Next: Part 2, The Hybrid Approach


Saturday, June 21, 2014

No. 68, The Animator's Thought Process

What I try to do here in this blog, in part, is to set down some of the thinking and decisions that an animator makes which are not usually recorded at all.

These consist of the more fleeting and detailed things that pass through an animator's mind as she or he works.  Ask an animator a year after a scene is animated about that animation and what he was thinking when he did it, and it is likely that he will not be able to say.  It might be possible to say, "Oh, that walk cycle--well, it has a nice rhythm, don't you think?" But the steps of planning, of paths considered and discarded, of things tried that did not work because they were too subtle or too over-the-top for the problem at hand--these things are most likely forgotten unless noted down or  unless committed to long-term memory by a discussion or some other event that forces the thinking to be articulated or recorded.

Thoughts of an animator.


But my belief is that these thoughts can be useful,  just as seeing the crumpled false starts from the waste basket or dustbin of a writer or illustrator can be useful, because they show to the aspiring animator that the path to a satisfying result is often not straight and smooth; that it is okay not to get it right the first time, and that a hard working and self-critical method of procedure can lead to success just as surely as the inspired stroke of genius of some Michelangelo of animation who seems to always get it right the first tiime.  If there really is such a thing.  Milt Kahl may have been a genius animator, but it is known that he would shut himself in his office alone for days or weeks at a time as he worked out his scenes.  It is fair to assume that he was testing and discardiing, homing in on his solutions more or less as the rest of us do.

And so the message of my step-by-step blog posts is: if something you animate is not working right, it can probably be fixed, and here are some of the many ways that can be used  1)to figure out what is wrong, and 2) to fix it so that it is working right.  Moreover, having established these critical habits in yourself, you may find that you do get to the right solution more directly and quickly in the future.

Let's hope so.  As for myself, I feel that I am still learning more every day and improving as an animator.

How about you?


Wednesday, June 11, 2014

No. 67, More About Animating 4-legged Animals


Four-footed Movement


It is worth pausing here to talk a little about animating animal legs.  You might suppose that if you've seen one four-legged critter moving, you've seen them all, but this is far from true. Once I assigned the animation of a little cartoon goat to one of my animators on a children's game.  She did a perfectly acceptable job on it and I approved it, but a week later I happened to see a goat walking and was struck by how the goat appeared to be walking tip-toe, like a woman wearing 5-inch heels and having to bend her knees slightly.  That's how they walk! It would have been a charming touch to have included in the scene.

In my last post I mentioned a book, Dog Lomotion and Gait Analysis, by Curtis Brown (Hoflin Publishing) that is a favorite reference for this kind of thing.

Dog Locomtion and Gait Analysis, by Curtis Brown

If you are interested, I find that this book is still available.  I also see that there are now some others on the same subject, but I cannot speak about them.

Even within a single species, not all animals move alike.  That is especially true of dogs, which have been bred to take so many different forms and proportions. Tall dogs, for example, tend to use the pace (moving both right legs forward together, then both left legs) instead of the trot (a front leg moves forward with the opposite rear leg).  Terriers will never move like greyhounds, even walking and standing.  The book goes into all this and more in great detail--in fact, probably in more detail than one would ever need.  But if I were animating a Lady and the Tramp or a 101 Dalmations today, I would certainly want this book at my desk.

A typical double-page spread from the book.
 I discovered Dog Lomotion by chance, and I have had my copy for many years.  In fact I wrote a review of it for Animation World Network back in 2000. Here is the link if you would like to read that review.

Of course now there is a wealth of movement reference of animals on the internet, most of it free as in YouTube, and I recommend that you take advantage of it whenever your assignments call for some realism in animal movement.

Elegant Anatomy


Let me draw your attention to one particular detail of four-legged anatomy that I think is common to all digitigrade mammals: the pastern.  Digitigrade means walking on the toes, as distinct from plantigrade, which means walking on the flat of the foot. (Bears and humans are plantigrade animals.) Most notably,  horses and dogs and cats have the pastern, as do all their close relatives.  It is a flexible joint in both front and rear feet that allows great energy to be suddenly released in running, and visually it is an animator's delight.


In the drawing above, from left to right, you can see the changes in the pastern joint of the front leg of a dog.  First it is compressed as it bears the full weight of the animal and propels him forward; when it is released and carried ahead it makes a sudden and beautiful flip, dragging the foot behind it; then as the whole leg is brought forward the foot drops down from the pastern, ready to make contact with the ground; and finally, pressure on the foot reverses the angle of the pastern once again.

Of course this all happens very quickly as the animal moves, but to include this action in the animation of dogs or other animals always adds a snappy elegance to their movement, and it is a prime example in nature of what the great animator Art Babbitt called "successive breaking of joints." You can exaggerate it; you can have fun with it; but you should never leave it out.

Here are 4 consecutive drawings from my fox's trot that show the pastern working.


Next:  Thought Process and the Animator


Wednesday, June 4, 2014

No. 66, Creating a Four-legged Walk Cycle

FOXTROT


A short while back ( Acme Punched posts No. 60 thru 62) I showed you my approach to creating a walk cycle for my character Albert.  Now here is a walk cycle, or rather a trot, for the little fox character.

First, a bit of re-design was in order.  I made the original model sheet without much attention to the real anatomy of a fox.  This is a cartoon and you can do that, but he does walk on all four feet so I have now decided it would be good to have him move something like a real fox, and for that, he has to be constructed a bit more like a real fox.


In the original model sheet, above, he is rather swaybacked and holds his tail erect.

The revised design makes his spine arc upward a little, as in real canines, and shows him holding his tail almost straight out behind him when moving.


 The Animation

Once again I wanted to try something I had read about but had never actually done: to animate the head, body and tail before doing the leg animation.  This is effective in animating dance and other controlled movement such as sword fighting.  Disney animators have used the technique in animating such semi-realistic creatures like deer (Bambi), though others actually did the reverse, animating the legs before the body. (I would cite a reference for that, but can't recall exactly where I read it.)

Anyway I thought it might work on my cycle of a fox trotting.


This was the first test.  It was made using just three drawings, with the middle drawing favoring the highest one in its spacing (see Fig. 1). I thought the rhythm was fine, but since the fox will sometimes be quite small on the screen, I decided it was too subtle.


Now for a broader movement, in which I simply let his body drop down farther.


At the time (we will come back to this) I thought it was fine, and went with it. Here is the spacing.


Then I was ready to add in the legs.  This is a basic canine trot.  I referenced a favorite but little-known book of mine: Dog Locomotion and Gait Analysis, by Curtis M. Brown.  Brown is not an animator but a dog breeder and dog show judge, but the sequential drawings of the gaits of various breeds are a gold mine for anyone interested in how dogs move.

Here is the test.


Hmm.  I sort of liked it when I saw it, but...something was not right.  Can you see what is wrong without reading further?

If you said that the head was moving too much, you would be right.  I had lowered the head along with the torso.  It is the same as it was in the second version without the legs (see Figure 2 again also), but somehow it was not apparent to me until I saw it all put together.

Solution?  Leave the torso as it is but just space the head much closer to the other heads.


Now it is working right.  Many animals avoid movement that bounces their heads up and down very much, because either they need steady vision for pursuit of prey or to detect danger.

One more thing I thought to do was to see if I could vary the speed--make him move faster--without removing any drawings.  (He may have to trot quickly to keep up with Albert's brisk walk.)  The slow speed is 8 drawings on 2's, or sixteen exposures, thus: 1, 1, 3, 3, 5, 5, 7, 7, 9, 9, 11, 11, 13, 13, 15, 15.  The numbers in bold are the lowest position.  The obvious thing to try here is to see if it will simply work on 1's: 1, 3, 5, 7, 9, 11, 13, 15.  But it looked too fast and also jerky, so I am not even showing it to you.  Although it does not always work to have some drawings of a walk cycle on 1's while others are on 2's, because of the danger of "slipping" against the steady movement of the background, I decided to try this: 1, 3, 3, 5, 5, 7, 9, 11,11, 13, 13 ,15.  In other words, I dropped the second exposure on drawings 1, 7, 9, and 15--just four frames fewer, but look at the result:


It seems to work!


Next: More about working with 4-legged characters!